Installation and Setup
Introduction
As part of my journey into Android security, I recently completed the Android App Hacking course on Udemy. This course offers a comprehensive, hands-on approach to understanding Android application security, focusing on real-world techniques for penetration testing. After this, I took the CMPen-Android exam and passed it.
I will be writing this series of blog posts as notes I prepared while taking this course. I highly recommend completing it.
Tools
For a complete list of recommended tools, visit the OWASP MASTG Tools Page.
MobSF
- MobSF (Mobile Security Framework) is an open-source automated security testing tool for mobile applications (Android, iOS, Windows).
- It performs static and dynamic analysis to identify security vulnerabilities.
- Supports APK (Android), IPA (iOS), and APPX (Windows) files.
1
2
3
4
5
6
7
8
git clone https://github.com/MobSF/Mobile-Security-Framework-MobSF.git
cd Mobile-Security-Framework-MobSF
python3 -m venv venv
source venv/bin/activate   # On Windows: venv\Scripts\activate
./setup.sh
./run.sh

# Web Interface is live on http://localhost:8000/
ADB
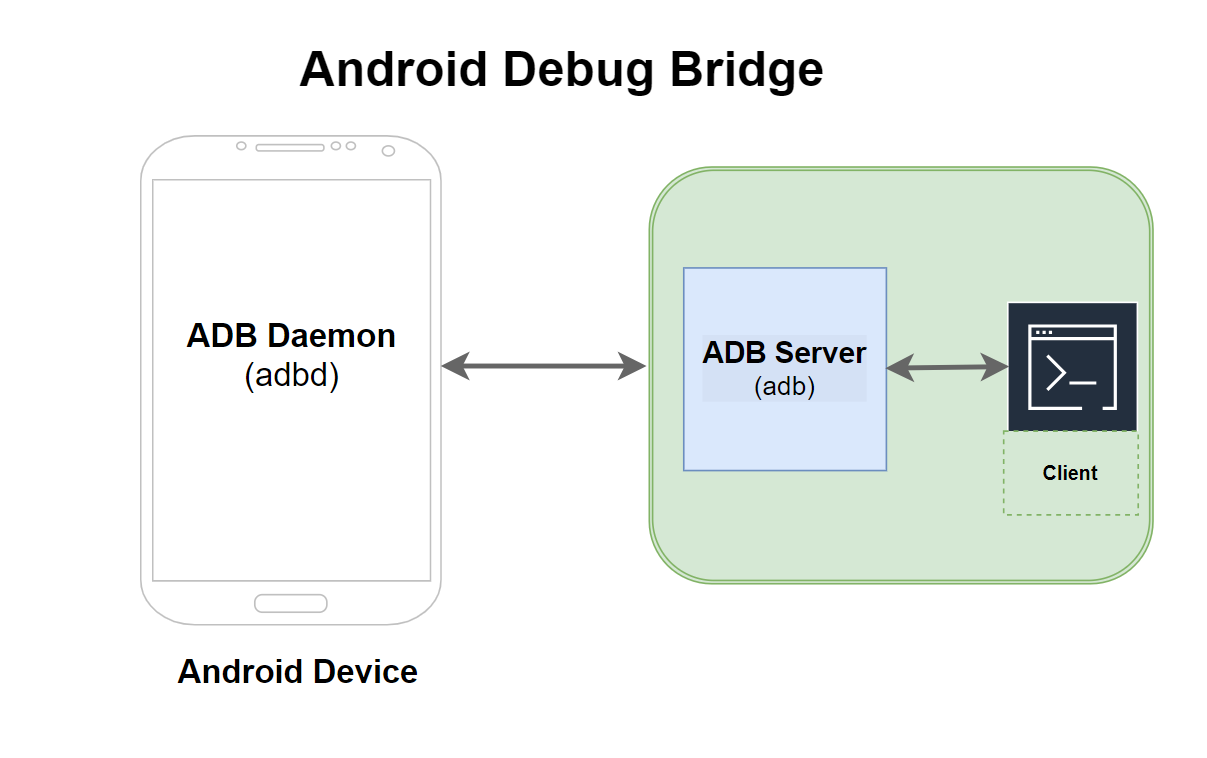
ADB is a command-line tool that allows communication between a computer and an Android device.
Components of ADB
ADB is a client-server architecture tool that acts as a bridge between your development machine and an Android device. Internally, it’s composed of three key components:
- Client – Sends commands; runs on your development machine.
- Daemon (adbd) – Runs on the device/emulator and handles commands.
- Server – Manages communication between the client and daemon.
Refer
How It Works – Step-by-Step
A. Initialization
- When you run an
adbcommand, the ADB client checks if the ADB server is running. - If not, it starts the server as a background process (usually on port
5037).
B. Device Connection
- The server scans for connected devices via:
- USB (using libusb)
- TCP/IP (via port
5555on the device)
- The ADB daemon (
adbd) on the Android device listens for connections on port5555(for wireless debugging) or via USB.
C. Communication Flow
- A socket connection is established between:
- Client ↔ Server ↔ Daemon.
- The server multiplexes commands to/from multiple clients and devices. Connecting to Devices
Advanced Usage
1
2
3
4
5
6
7
8
9
# Connect using IP
adb connect <IP>

# Port Forwarding
adb forward tcp:<host> tcp:<device>

# Screen record:
adb shell screenrecord /sdcard/demo.mp4
adb pull /sdcard/demo.mp4
Following commands allow you to redirect network traffic between the host and the Android device.
adb forward
Forward a port from your host → to the device.
1
adb forward <local> <remote>
1
adb forward tcp:8080 tcp:80
- Maps host port 8080 to device port 80.
- Now, accessing
localhost:8080on your computer actually connects to port 80 on the device.
adb reverse
Forward a port from your device → to the host.
1
adb reverse <remote> <local>
1
adb reverse tcp:8081 tcp:8081
- Device port 8081 connects to host port 8081.
- Now, the Android app on the device can call
localhost:8081to reach your dev server.
ADB Authentication
Since Android 4.2.2, ADB uses public-key authentication:
- When connecting, the host sends its public key to the device.
- The device prompts the user to trust the computer.
- If accepted, the key is saved in
/data/misc/adb/adb_keys.
Multiple Devices
1
2
adb devices
adb -s <serial> shell
ADB uses a proprietary protocol specifically designed by Android for communication between adb client (on the host machine), adb server (on the host) and adb daemon (adbd, on the android device).
It primarily over TCP sockets (port 5037 on host, 5555 on device for wireless) or USB
It uses a fixed-size 24-byte binary headers + optional payloads.