Linux Kernel Programming
Introduction
Linux Kernel Programming is the art and science of writing code that directly interacts with the core of the Linux operating system — the kernel.
In this blog, we’ll explore the fundamentals of kernel programming, starting from setting up the environment, writing and loading your first kernel module, and gradually diving into more advanced topics.
The Linux kernel is the core component of the Linux operating system. It acts as a bridge between applications and hardware, managing system resources such as:
- CPU (Process scheduling)
- Memory (Virtual memory management)
- Devices (Drivers for hardware interaction)
- Filesystems (Handling storage devices)
- Networking (TCP/IP stack, sockets, etc.)
The kernel runs in privileged mode (kernel space), unlike user applications that run in user space.
A kernel is the central part of an operating system that manages system resources and communication between hardware and software. It controls processes, memory management, device drivers, and system calls. The Linux kernel is known for its modularity, allowing developers to load and unload components (modules) dynamically.
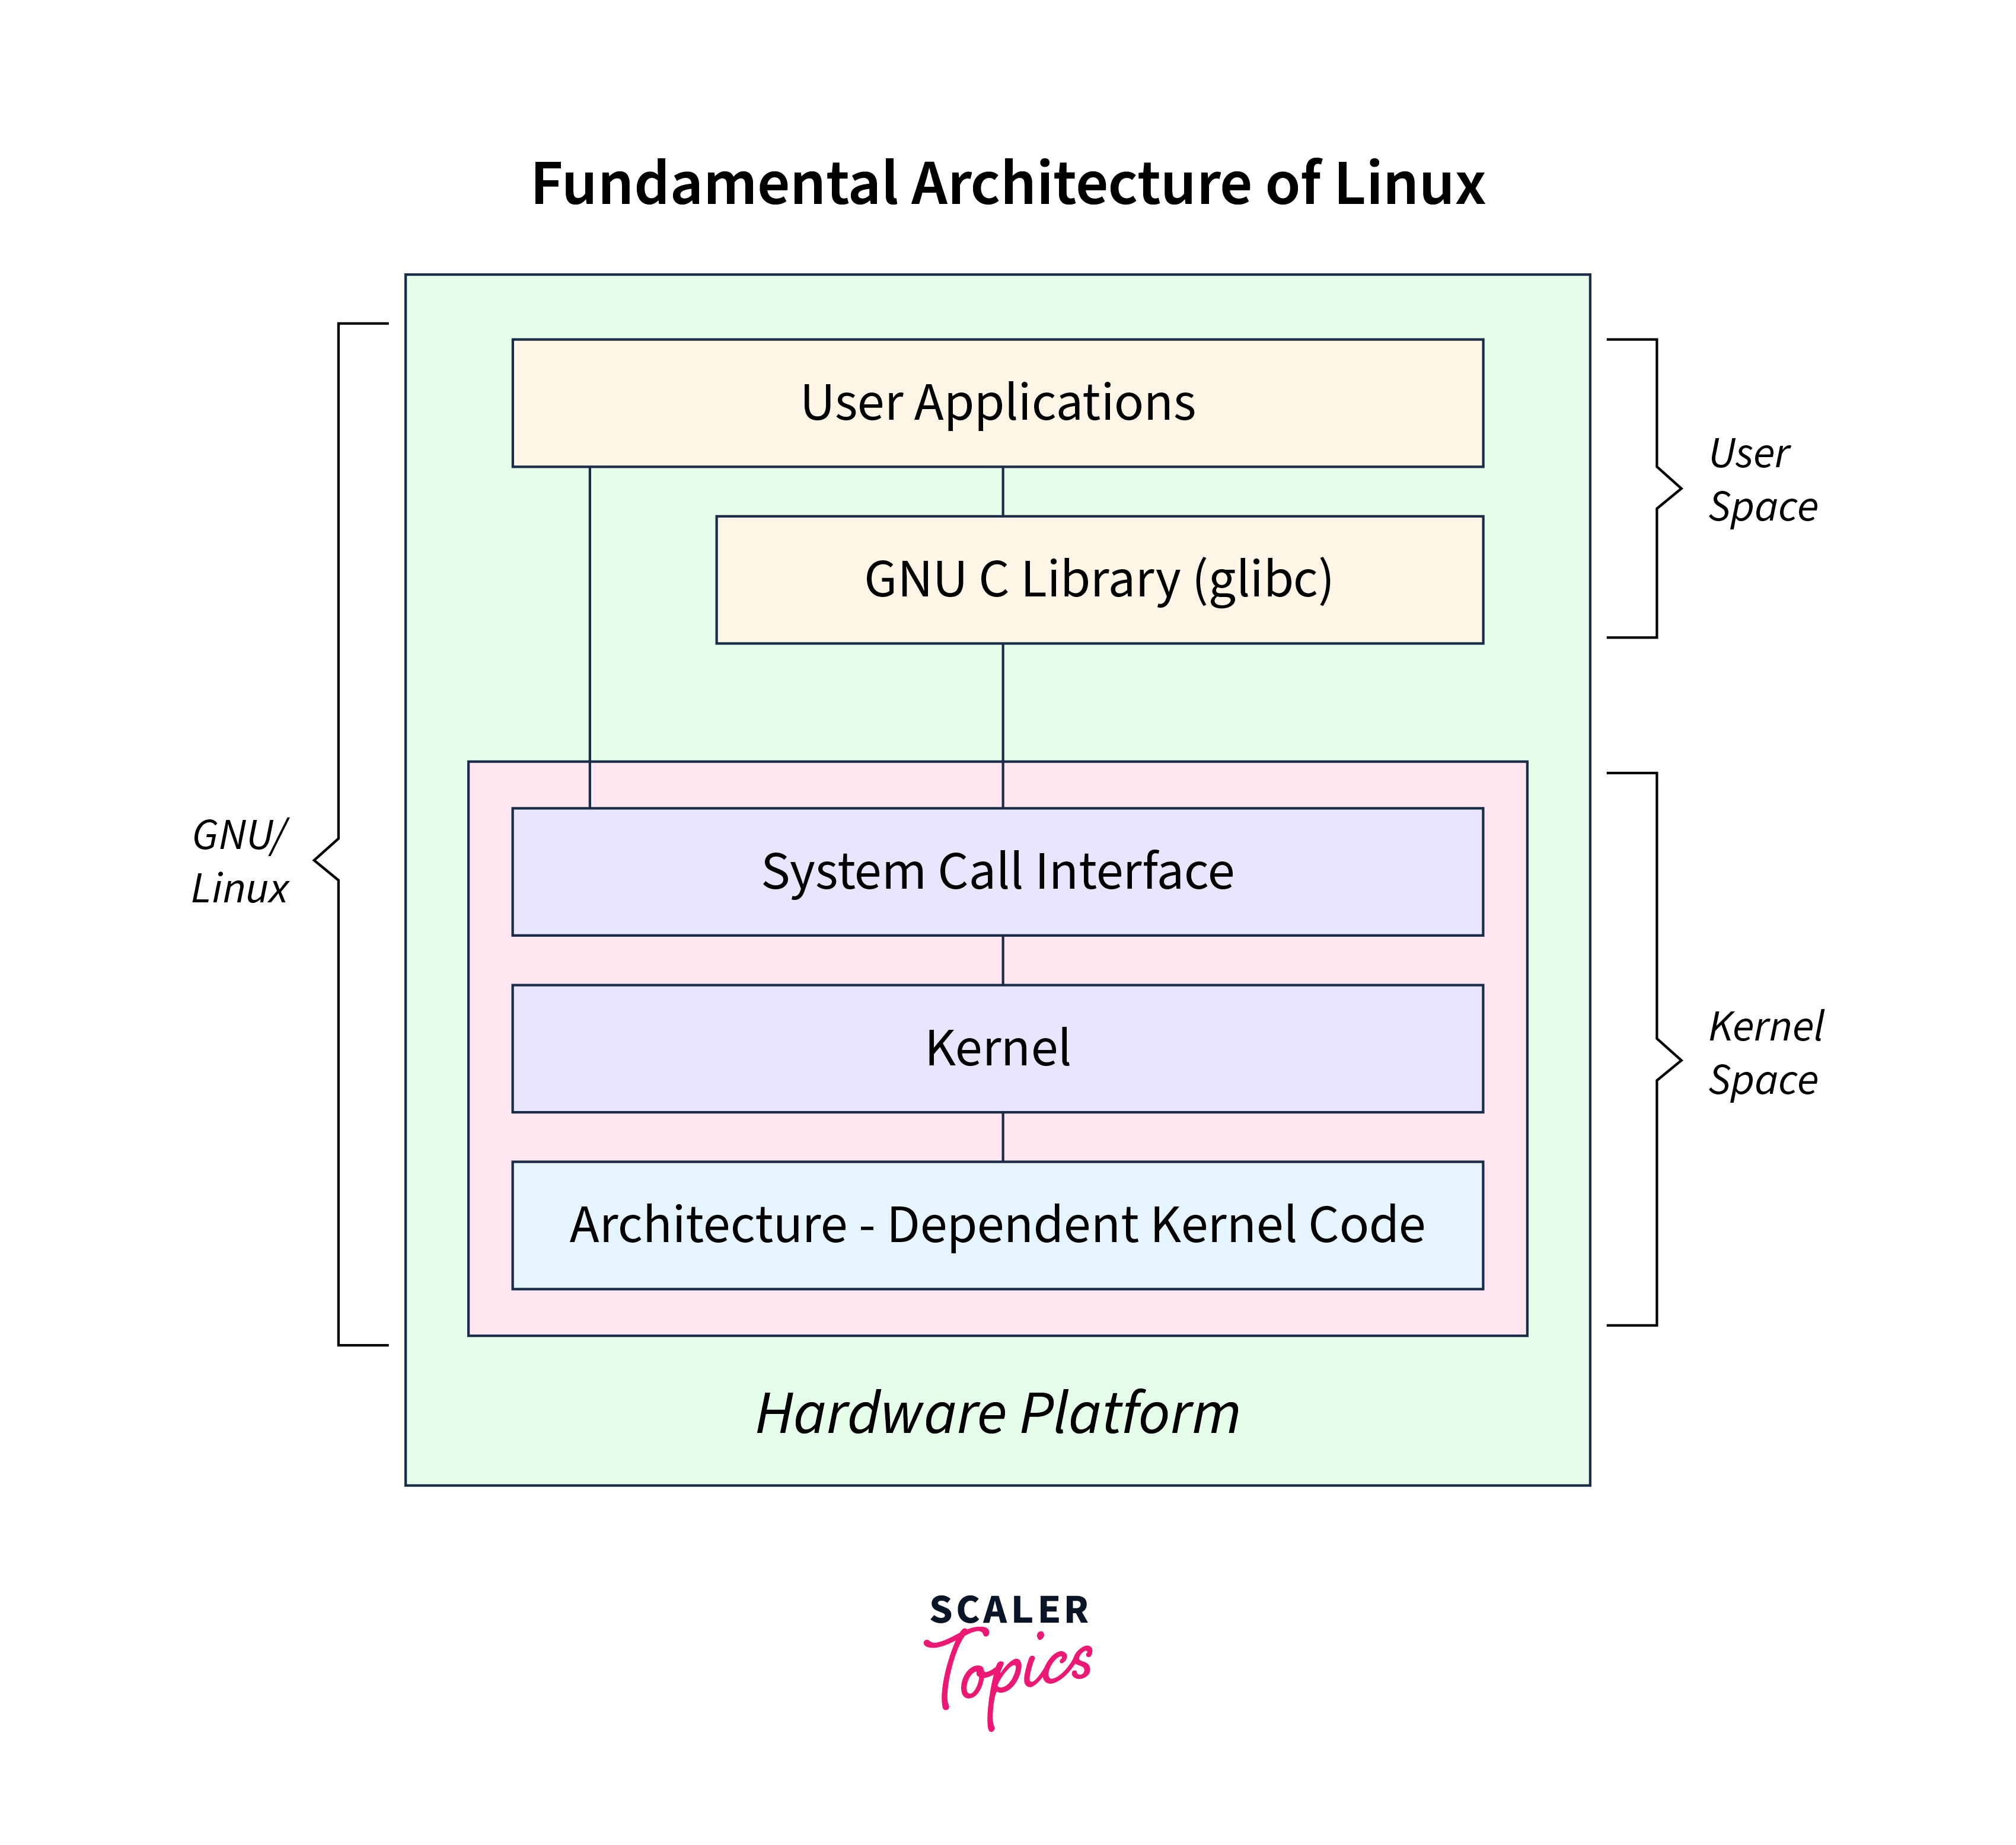
Fundamental Architecture of Linux
The fundamental architecture of Linux is divided into main two parts:
- User Space
- Kernel Space
Source scaler
Key Features of the Linux Kernel
- Monolithic architecture: Most services run in kernel space for high performance.
- Modularity: Supports loadable modules that can be added or removed without rebooting.
- Device drivers: Includes many drivers for hardware like printers, graphics, and storage.
Linux Kernel Module vs Device Driver
| Aspect | Kernel Module | Device Driver |
|---|---|---|
| Definition | A piece of code that can be dynamically loaded/unloaded into the kernel. | A specific type of kernel module that interfaces with hardware (or virtual devices). |
| Purpose | Extends kernel functionality (not necessarily hardware-related). | Enables the OS to communicate with hardware (e.g., USB, GPU, network cards). |
| Scope | Broader (can be anything: filesystems, security modules, etc.). | Narrower (focused on hardware control). |
| Examples | - iptables (netfilter module) - ext4 filesystem - Custom /proc entries | - e1000 (Ethernet driver) - nvidia (GPU driver) - usb-storage (USB driver) |
All device drivers are kernel modules, but not all kernel modules are drivers.
NOTE:
A custom /proc module is a kernel module but not a driver.
- Modules: Listed in
/proc/modulesorlsmod. - Drivers: Exposed via:
- Device files (
/dev/). - Sysfs (
/sys/class/).
- Device files (
Linux Kernel Module
Kernel modules are pieces of code that can be loaded into the kernel on demand, allowing the kernel to extend its functionality dynamically. They are typically used for device drivers, file systems, and other features that may not be needed at all times. Modules can also be configured to load automatically at boot time by placing their names in configuration files located in /etc/modules-load.d/ and using modules.conf. This allows the system to load necessary modules during the initialisation process without user intervention.
Files with the .ko extension represent compiled Loadable Kernel Modules. The “.ko” stands for “kernel object,” indicating that these files contain object code intended for use within the kernel. The .ko files are typically located in directories such as /lib/modules/$(uname -r)/ and are loaded into the kernel using commands like modprobe or insmod.
The configuration option CONFIG_MODULES=y in the Linux kernel enables support for loadable kernel modules. This means that the kernel can dynamically load and unload modules as needed, which extends its functionality without requiring a reboot.
Check the Kernel Configuration File
The kernel configuration is typically stored in /boot/config-$(uname -r) for the currently running kernel. You can view it using:
1
$ cat /boot/config-$(uname -r) | grep CONFIG_MODULES
Using zcat on Compressed Config Files
If your kernel configuration file is compressed, you can use zcat to view it directly:
1
$ zcat /proc/config.gz | grep CONFIG_MODULES
Kernel modules in Linux can be categorized into two primary types based on their relationship with the kernel source tree: in-tree modules and out-of-tree modules.
In-Tree Modules: In-tree modules are those that are part of the official Linux kernel source tree
Out-of-Tree Modules: Out-of-tree modules are developed outside of the official Linux kernel source tree.
For in-tree modules intree flag is set to Y in modinfo command output.
1
2
$ modinfo cryptd | grep intree
intree:         Y
A split view of the kernel

Source orielly
In Linux, user applications interact with system libraries, which talk to the kernel through system calls. The kernel manages hardware resources—like CPU, memory, storage, and devices—using core components such as schedulers, memory managers, file systems, networking stacks, and device drivers. This layered design separates user space from kernel space, improving stability, flexibility, and security.
System Calls
The kernel provides a set of system calls that user-space applications use to request services from the kernel, such as file operations, process control, and network communication. This interface acts as a bridge between user space and kernel space.
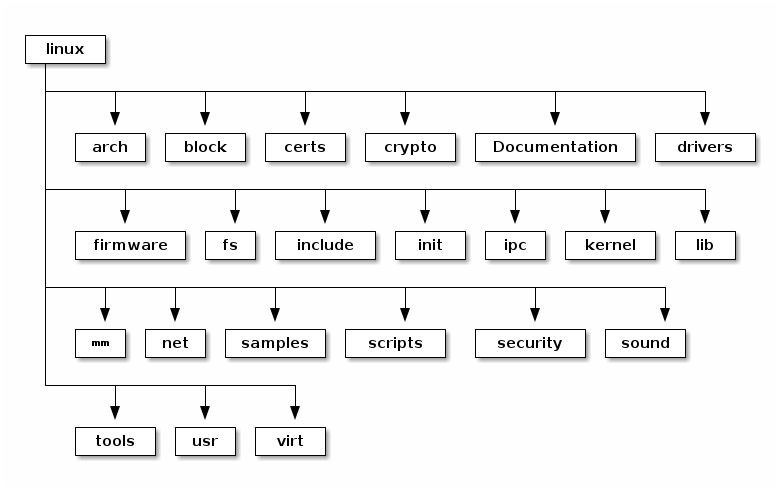
The top-level directory of the Linux kernel source code is typically located at /usr/src/linux-<version>. It contains various sub-directories and files essential for building and managing the kernel.
Linux Kernel Source Structure
Source linux-kernel-labs
Device Drivers
A device driver is a specialized piece of software that allows the operating system (OS) to communicate with hardware devices. It acts as an intermediary, translating OS commands into device-specific actions. Without drivers, the OS would not be able to interact with hardware components effectively, as each device has its own unique set of instructions and configurations.
Types of Device Drivers
In Linux, device drivers can be categorized into three main types based on how they handle data:
- Character Devices: These devices transmit data as a stream of bytes (e.g., keyboards, mice). They are accessed directly without buffering. They are typically found under
/dev/and can be identified by acin file listings. Examples: Serial ports, keyboards, mice, printers, audio devices - Block Devices: These handle data in fixed-size blocks (e.g., hard drives, USB drives). They can host a filesystem and allow random access to data blocks. Examples: Hard disks (
/dev/sda), SSDs, USB storage drives, CD-ROMs. - Network Devices: These facilitate network communications and are treated similarly to character devices in terms of access. Examples: Ethernet cards, Wi-Fi adapters, loopback device.
 ‘ Source myembeddeddiary
The usb-storage driver allows the OS to communicate with USB mass storage devices, enabling file transfers. A simple character device module could be a driver for a virtual device that reads and writes data as a stream.
Now that we’ve covered the theory, it’s time to get our hands dirty and write a Linux Kernel Module (LKM).

Steps for Writing a Loadable Kernel Module (LKM)
1. Install Required Packages:
Ensure you have the necessary tools and libraries installed. You typically need the kernel headers and build tools.
1
$ sudo apt-get install build-essential linux-headers-$(uname -r)
The kernel headers provide the interfaces and symbol definitions necessary to write and build code that integrates with the Linux kernel.
2. Create a Source File:
Use a text editor to create a new C file for your module, e.g., hello.c.
1
2
3
4
5
6
7
8
9
10
11
12
13
14
15
16
17
18
19
20
21
/*
 hello.c
*/
#include <linux/module.h>
#include <linux/kernel.h>

MODULE_LICENSE("GPL");
MODULE_AUTHOR("nyxFault");
MODULE_DESCRIPTION("A simple Hello World LKM");

static int __init hello_init(void) {
    printk(KERN_INFO "Hello, World!\n");
    return 0;
}

static void __exit hello_exit(void) {
    printk(KERN_INFO "Goodbye, World!\n");
}

module_init(hello_init);
module_exit(hello_exit);
3. Write a Makefile:
This file will define how to build your module.
1
2
3
4
5
6
7
obj-m += hello.o

all:
    make -C /lib/modules/$(shell uname -r)/build M=$(PWD) modules

clean:
    make -C /lib/modules/$(shell uname -r)/build M=$(PWD) clean
Please keep in mind to use TAB before make -C ....
4. Build Your Module:
Run the following command in your terminal to compile the LKM.
1
$ make
You will have following files -
1
2
3
$ ls
hello.c   hello.mod    hello.mod.o  Makefile       Module.symvers
hello.ko  hello.mod.c  hello.o      modules.order
5. Load the Module
1
2
3
4
5
6
$ # Use insmod to load your module.
$ sudo insmod hello.ko

$ # Check for Successful Loading
$ lsmod | grep hello
$ dmesg | tail -n 10
6. Remove the Module
1
2
3
4
5
$ # Unload the Module from the Kernel
$ sudo rmmod hello

$ # Check Kernel Messages Again:
$ dmesg | tail -n 10
module.h provides macros like module_init and module_exit and functions, while kernel.h contains essential kernel macros like printk, including logging.
The kernel headers are generally stored in the /usr/src directory. You should see a subdirectory that corresponds to the version of the currently running kernel, such as /usr/src/linux-headers-<version> where <version> matches the output of uname -r
MODULES_* macros provide metadata about the module.
The hello_init function is marked with __init, indicating that it is used for initialization. The hello_exit function is marked with __exit, indicating it is called when the module is removed.
module_init() and module_exit() macros define the entry and exit points of the module. When the module is loaded into the kernel, hello_init is called, and when it is removed, hello_exit is executed.
modinfo
modinfo is a Linux command-line tool that displays information about a kernel module (.ko file). It reads metadata embedded in the module—such as author, license, description, parameters, dependencies—without loading the module into the kernel.
1
2
3
4
5
6
7
8
9
10
$ modinfo hello.ko
filename:       /tmp/Kern-Dev/hello.ko
description:    A simple Hello World LKM
author:         nyxFault
license:        GPL
srcversion:     CE6D97B7AD4523C3CFC6A34
depends:
retpoline:      Y
name:           hello
vermagic:       6.8.0-64-generic SMP preempt mod_unload modversions
VERMAGIC
The term vermagic refers to a specific string associated with Linux kernel modules that provides information about the kernel version and configuration options used to compile the module. ermagic is a string that contains details about the kernel version, architecture, and certain configuration options (like SMP support, module unloading capabilities, etc.) that were used when the kernel was compiled. It is defined in the kernel source code, specifically in vermagic.h.
You can view the vermagic string of a compiled kernel module using the modinfo command:
1
$ modinfo -F vermagic hello.ko
The .modinfo section is automatically generated when a kernel module is compiled using the appropriate macros. It includes vermagic.
1
2
3
4
5
6
7
8
$ objdump --section=.modinfo --full-contents hello.ko

hello.ko:     file format elf64-x86-64

Contents of section .modinfo:
 0000 64657363 72697074 696f6e3d 41207369  description=A si
 0010 6d706c65 2048656c 6c6f2057 6f726c64  mple Hello World
#...
Same out you’ve received when using modinfo.
To create a kernel module that prints the function name where printk is called, you can utilize the __func__ predefined identifier in the C programming language that automatically holds the name of the function in which it is used. This feature was introduced in the C99 standard and is useful for debugging and logging purposes.
1
2
3
4
5
6
7
8
9
10
11
12
13
14
15
16
17
18
19
20
21
22
23
#include <linux/module.h>
#include <linux/kernel.h>
#include <linux/init.h>

// Module initialization function
static int __init my_module_init(void)
{
    printk(KERN_INFO "Entered function: %s\n", __func__);
    return 0;
}

// Module cleanup function
static void __exit my_module_exit(void)
{
    printk(KERN_INFO "Exiting function: %s\n", __func__);
}

module_init(my_module_init);
module_exit(my_module_exit);

MODULE_LICENSE("GPL");
MODULE_AUTHOR("nyxFault");
MODULE_DESCRIPTION("A simple kernel module to log function names using printk");
On running, make command:
1
2
3
4
5
6
7
8
9
10
11
12
13
$ make
make -C /lib/modules/6.8.0-64-generic/build M=/tmp/Kern-Dev modules
make[1]: Entering directory '/usr/src/linux-headers-6.8.0-64-generic'
warning: the compiler differs from the one used to build the kernel
  The kernel was built by: x86_64-linux-gnu-gcc-12 (Ubuntu 12.3.0-1ubuntu1~22.04) 12.3.0
  You are using:           gcc-12 (Ubuntu 12.3.0-1ubuntu1~22.04) 12.3.0
  CC [M]  /tmp/Kern-Dev/hello-func.o
  MODPOST /tmp/Kern-Dev/Module.symvers
  CC [M]  /tmp/Kern-Dev/hello-func.mod.o
  LD [M]  /tmp/Kern-Dev/hello-func.ko
  BTF [M] /tmp/Kern-Dev/hello-func.ko
Skipping BTF generation for /tmp/Kern-Dev/hello-func.ko due to unavailability of vmlinux
make[1]: Leaving directory '/usr/src/linux-headers-6.8.0-64-generic'
The error you see, related to BTF generation being skipped due to the unavailability of vmlinux, isn’t typically critical for basic kernel module functionality, but if you’d like to resolve it and enable full BTF support, you’ll need to obtain the vmlinux file or configure your build environment accordingly. The vmlinux file contains debugging information, and the BTF generation requires it. On many distributions, you can install the required kernel debug symbols package to get the vmlinux file.
The kernel debug symbol packages (-dbgsym) are not available by default—Ubuntu keeps them in a special repository called “ddebs.”
You need to add the DDEBS (debug symbol) repositories to your system:
1
2
3
4
5
6
sudo tee /etc/apt/sources.list.d/ddebs.list <<EOF
deb http://ddebs.ubuntu.com $(lsb_release -cs) main restricted universe multiverse
deb http://ddebs.ubuntu.com $(lsb_release -cs)-security main restricted universe multiverse
deb http://ddebs.ubuntu.com $(lsb_release -cs)-updates main restricted universe multiverse
deb http://ddebs.ubuntu.com $(lsb_release -cs)-proposed main restricted universe multiverse
EOF
Add the repository GPG key:
1
sudo apt-key adv --keyserver keyserver.ubuntu.com --recv-keys C8CAB6595FDFF622
Then update packages:
1
sudo apt-get update
Install the debug symbols package:
1
sudo apt-get install linux-image-$(uname -r)-dbgsym
printk() is a fundamental function in the Linux kernel, primarily used for logging messages. It serves as the kernel’s equivalent of the standard C library function printf(), but with significant differences tailored for kernel-level operations.
printk() enables developers to output messages to the kernel log buffer, which is a ring buffer accessible from user space through /dev/kmsg. This is crucial for debugging and tracing kernel operations. printk() writes to the kernel buffer, whereas printf() writes to the standard output.
The printk function in the Linux kernel is a critical logging mechanism that uses a ring buffer to store log messages. This buffer has a size defined by __LOG_BUF_LEN, which is calculated based on the configuration option CONFIG_LOG_BUF_SHIFT.
In kernel/printk/printk.c you will find:
1
2
3
#define __LOG_BUF_LEN (1 << CONFIG_LOG_BUF_SHIFT)
#define LOG_BUF_LEN_MAX (u32)(1 << 31)
static char __log_buf[__LOG_BUF_LEN] __aligned(LOG_ALIGN);
1
2
$ cat /boot/config-$(uname -r) | grep CONFIG_LOG_BUF_SHIFT
CONFIG_LOG_BUF_SHIFT=17
You can change default buffer size from menuconfig while compiling the kernel.
make menuconfig -> General Setup -> Kernel log buffer size
To increase the buffer size we can also use the command line:
log_buf_len = 4M
One of the key features of printk() is its ability to specify log levels, allowing messages to be categorized based on their severity. The log levels range from KERN_EMERG (0) for emergency messages to KERN_DEBUG (7) for debug information. This categorization helps in filtering messages based on their importance when reading logs. The log levels can be checked and modified via /proc/sys/kernel/printk, allowing dynamic control over which messages are printed to the console based on their severity.
1
printk(KERN_log_priority "Hello World!");
Here, log_priority is one of the eight values (predefined in linux/kernel.h, similar to /usr/include/sys/syslog.h).
To generate multiple kernel modules from multiple .c files, you can modify the Makefile to handle the compilation and linkage of each .c file into its own kernel module.
1
2
3
4
5
obj-m := module1.o module2.o   # Define the object files for each module

# OR
obj-m := module1.o
obj-m += module2.o
To generate .ko with different name, we can modify the Makefile:
1
2
3
4
5
6
7
8
9
# we want to generate new-world.ko

obj-m := new-world.o
new-world-objs := hello-world.o

all:
	//
clean:
	//
From .c to .ko
The kbuild system is responsible for building kernel modules and is controlled via a Makefile located in the module’s directory. When you write a kernel module (e.g., module1.c), you need a Makefile to instruct the build process.
The Makefile used to build kernel modules is different from a regular user-space Makefile. It uses the kbuild system, which is tightly integrated with the kernel’s build system. The obj-m := variable is crucial in the Makefile, as it specifies which object files (i.e., kernel modules) need to be built.
obj-m stands for “object modules”.
When you run make in the module’s directory, the kbuild system will read the Makefile and:
- Check for the required kernel headers in
/lib/modules/$(shell uname -r)/build. - Compile the source files (e.g.,
module1.cand module2.c) into object files (module1.oandmodule2.o). - Link these object files into .ko (kernel object) files.
The modules.symvers file contains symbol version information for all exported symbols from kernel modules. This includes both the names of the symbols and their corresponding checksums or versioning information.
The modules.order file records the order in which modules appear in Makefiles. This order is crucial for correctly loading modules, especially when there are dependencies between them.
The modulename.mod.c is a file that basically contains the information about the module (Version information etc).
The modulename.o and the modulename.mod.o are linked together by modpost in the next stage to create the “modulename.ko”
To create a Linux kernel module that prints its own name, you can use the THIS_MODULE macro, which provides access to the module’s metadata, including its name.
1
2
3
4
5
6
7
8
9
10
11
12
13
14
15
16
#include <linux/module.h>
#include <linux/kernel.h>

MODULE_LICENSE("GPL");

static int __init moduleEntry(void) {
    printk(KERN_INFO "Module Name %s",THIS_MODULE->name);
    return 0;
}

static void __exit moduleExit(void) {
    printk(KERN_INFO "Goodbye world.\n");
}

module_init(moduleEntry);
module_exit(moduleExit);
Loading Module without License
If you try to loading proprietary (non-GPL) or out-of-tree modules (such as certain graphics or hardware drivers). By specifying MODULE_LICENSE("Proprietary"), your module triggers the “proprietary module loaded” taint flag.
A tainted kernel in Linux refers to a kernel that has been marked with one or more flags indicating that it is in a state that might affect its stability or functionality. If a module is loaded that is not officially supported by the kernel maintainers, this can also lead to a taint. In addition, some debugging functionality and API calls may be disabled when the kernel is tainted.
Here are some common reasons why a kernel might become tainted:
- Proprietary Modules
- Unsupported Modules
- License Issues
- Kernel Errors
Checking Kernel Taint Status
1
$ cat /proc/sys/kernel/tainted
If this command returns 0, the kernel is not tainted. Any other number indicates various reasons for tainting, which can be decoded using specific scripts or tools provided in the Linux kernel documentation.
The easiest way to decode the number returned by above command is to use the script kernel-chktaint
Parameter Passing in Loadable Kernel Modules (LKM)
- Using
module_paramMacro declared inmoduleparam.hThemodule_parammacro is the primary mechanism for passing parameters to kernel modules. It allows you to define module parameters that can be set at module load time or modified later through the sysfs interface.
1
2
3
4
5
6
7
8
9
10
11
12
/**
 * module_param - typesafe helper for a module/cmdline parameter
 * @name: the variable to alter, and exposed parameter name.
 * @type: the type of the parameter
 * @perm: visibility in sysfs.
 * Standard types are:
 *	byte, hexint, short, ushort, int, uint, long, ulong
 *	charp: a character pointer
 *	bool: a bool, values 0/1, y/n, Y/N.
 *	invbool: the above, only sense-reversed (N = true).
 */
module_param(name, type, permissions);
- name: The name of the variable that will hold the parameter value.
- type: The data type of the parameter (e.g., int, charp for strings).
- permissions: Access permissions for the parameter file created in
/sys/module/<module_name>/parameters/.
- Passing Parameters at Load Time Parameters can be passed when loading a module using insmod or modprobe. The format is similar to command-line arguments in user-space applications.
Note: When passing strings, they should be enclosed in double quotes and the entire argument should be wrapped in single quotes if necessary. The reason for this is shell removes double quotes and pass it to insmod, to avoid this add a single quotes over the string.
1
$ sudo insmod mymodule.ko my_string='"Hello World"'
- Runtime Modification of Parameters Once a module is loaded, its parameters can be modified at runtime through the sysfs interface. Each parameter defined with
module_paramcreates a corresponding entry in/sys/module/<module_name>/parameters/.
Accessing Parameters:
1
2
3
4
5
$ # To view a parameter:
$ cat /sys/module/mymodule/parameters/my_int

$ # To modify a parameter (requires appropriate permissions):
$ echo "30" > /sys/module/mymodule/parameters/my_int
- Parameter Types The
module_parammacro supports various types including:- Integer (
int): For integer values. - String (
charp): For character strings. - Array (
module_param_array): For arrays of integers or strings.
- Integer (
- Documentation with
MODULE_PARM_DESCTo provide documentation for each parameter, use theMODULE_PARM_DESCmacro. This helps users understand what parameters are available and their purpose.
1
MODULE_PARM_DESC(my_int, "An integer parameter");
To pass an array as a parameter to a Linux kernel module, you can use the module_param_array() macro. This macro allows you to define an array parameter that can be initialized with a comma-separated list of values when loading the module.
The module_param_array() macro is used to declare an array parameter in your kernel module. Its syntax is as follows:
1
module_param_array(name, type, num, perm);
- name: The name of the array variable.
- type: The data type of the array elements (e.g., charp for strings).
- num: A pointer to an integer variable that will store the number of elements in the array (can be NULL if you don’t need this).
- perm: Permissions for the sysfs entry (e.g., S_IRUGO for read access).
Following kernel module to accept an integer argument (e.g. num=1) at load time.
Steps -
- Declare a module parameter variable.
- Use the
module_parammacro.
1
2
3
4
5
6
7
8
9
10
11
12
13
14
15
16
17
18
19
20
21
22
23
24
25
26
27
#include <linux/module.h>
#include <linux/kernel.h>

MODULE_LICENSE("GPL");
MODULE_AUTHOR("nyxFault");
MODULE_DESCRIPTION("A simple Hello World LKM with argument");

// Step 1: Declare a global variable for the parameter
static int num = 1;

// Step 2: Register the parameter (name, type, permissions)
// permissions: 0644 makes it readable/writable in /sys/module/hello/parameters/num
module_param(num, int, 0644);
MODULE_PARM_DESC(num, "An integer parameter");

// Step 3: Use the parameter in your code
static int __init hello_init(void) {
    printk(KERN_INFO "Hello, World! num=%d\n", num);
    return 0;
}

static void __exit hello_exit(void) {
    printk(KERN_INFO "Goodbye, World! num=%d\n", num);
}

module_init(hello_init);
module_exit(hello_exit);
We will give argument as num=1.
1
2
$ make
$ sudo insmod hello.ko num=1
In dmesg we can verify that -
1
2
$ sudo dmesg -wH
[Jul20 16:10] Hello, World! num=1
Now, as we’ve earlier discussed the parameters can be modified at runtime through the sysfs interface.
1
2
3
4
5
$ cat /sys/module/hello/parameters/num
1

# Let's modify it (We need to be root)
$ echo 0 | sudo tee /sys/module/hello/parameters/num
Now, after unloading the module we can check the value of num -
1
2
[Jul20 16:17] Hello, World! num=1
[  +7.976876] Goodbye, World! num=0
Here’s a complete kernel module that takes an array of integers, sums them up, and prints the result when the module is loaded.
1
2
3
4
5
6
7
8
9
10
11
12
13
14
15
16
17
18
19
20
21
22
23
24
25
26
27
28
29
30
31
32
33
34
35
36
37
38
39
40
41
42
43
44
/*
param-module.c
*/
#include <linux/module.h>
#include <linux/moduleparam.h>
#include <linux/kernel.h>

MODULE_LICENSE("GPL");
MODULE_AUTHOR("nyxFault");
MODULE_DESCRIPTION("A kernel module that sums an array of integers.");
MODULE_VERSION("1.0");

// Declare parameters
static int numbers[10]; // Array to hold up to 10 integers
static int number_of_elements = 0; // Variable to hold the number of elements

// Define the module parameter array
module_param_array(numbers, int, &number_of_elements, S_IRUGO);
MODULE_PARM_DESC(numbers, "An array of integers");

// Initialization function
static int __init my_module_init(void) {
    int i;
    int sum = 0;

    // Calculate the sum of the numbers
    for (i = 0; i < number_of_elements; i++) {
        sum += numbers[i];
    }

    printk(KERN_INFO "Module loaded: %d integers provided.\n", number_of_elements);
    printk(KERN_INFO "Sum of the provided integers: %d\n", sum);

    return 0; // Return 0 indicates successful initialization
}

// Cleanup function
static void __exit my_module_exit(void) {
    printk(KERN_INFO "Module unloaded\n");
}

// Registering the initialization and cleanup functions
module_init(my_module_init);
module_exit(my_module_exit);
1
2
$ make
$ sudo insmod param-module.ko numbers=1,2,3,4,5
In Kernel logs you’ll find -
1
2
3
$ sudo dmesg -wH
[Jul20 16:02] Module loaded: 5 integers provided.
[  +0.000004] Sum of the provided integers: 15
Following is a kernel module that takes an array of strings as parameters and prints each string when the module is loaded.
1
2
3
4
5
6
7
8
9
10
11
12
13
14
15
16
17
18
19
20
21
22
23
24
25
26
27
28
29
30
31
32
33
34
35
36
37
#include <linux/module.h>
#include <linux/moduleparam.h>
#include <linux/kernel.h>

MODULE_LICENSE("GPL");
MODULE_AUTHOR("nyxFault");
MODULE_DESCRIPTION("A kernel module that prints an array of strings.");
MODULE_VERSION("1.0");

// Declare parameters
static char *words[10]; // Array to hold up to 10 strings
static int number_of_words = 0; // Variable to hold the number of words

// Define the module parameter array
module_param_array(words, charp, &number_of_words, S_IRUGO);
MODULE_PARM_DESC(words, "An array of strings");

// Initialization function
static int __init my_module_init(void) {
    int i;

    printk(KERN_INFO "Module loaded: %d words provided:\n", number_of_words);
    for (i = 0; i < number_of_words; i++) {
        printk(KERN_INFO "Word %d: %s\n", i + 1, words[i]);
    }

    return 0; // Return 0 indicates successful initialization
}

// Cleanup function
static void __exit my_module_exit(void) {
    printk(KERN_INFO "Module unloaded\n");
}

// Registering the initialization and cleanup functions
module_init(my_module_init);
module_exit(my_module_exit);
1
$ sudo insmod module-param.ko words="Hello,World,This,is,a,test"
In Kernel logs -
1
2
3
4
5
6
$ sudo dmesg -wH
[Jul20 16:06] Module loaded: 4 words provided:
[  +0.000008] Word 1: This
[  +0.000002] Word 2: is
[  +0.000001] Word 3: Kernel
[  +0.000002] Word 4: Programming
Hex Dump
The print_hex_dump function in the Linux kernel is a utility used for printing a hexadecimal and ASCII representation of binary data, making it easier to debug and analyze the contents of memory buffers. This function is particularly useful in scenarios where developers need to inspect the raw data being processed by the kernel.
1
void print_hex_dump(const char *level, int prefix_type, const void *buf, size_t len);
Parameters:
- level: Specifies the kernel log level (e.g.,
KERN_DEBUG,KERN_INFO), which determines the severity of the message. - prefix_type: Controls whether a prefix (like an offset or address) is printed with each line of output. Common options include:
DUMP_PREFIX_NONE: No prefix.DUMP_PREFIX_ADDRESS: Print the address of the data.DUMP_PREFIX_OFFSET: Print the offset from the start of the buffer.
- buf: A pointer to the data buffer that needs to be dumped.
- len: The number of bytes in the buffer.
1
2
3
4
5
6
7
8
9
10
11
12
13
14
15
16
17
18
19
20
21
22
23
24
25
26
/*
print_hexdump.c
*/
#include <linux/module.h>
#include <linux/kernel.h>

static int __init my_module_init(void) {
    char data[] = "Hello Kernel!";
    size_t len = sizeof(data);

    printk(KERN_INFO "Dumping data:\n");
    print_hex_dump(KERN_DEBUG, "", DUMP_PREFIX_OFFSET, 16, 1, data, len, true);

    return 0;
}

static void __exit my_module_exit(void) {
    printk(KERN_INFO "Module exiting\n");
}

module_init(my_module_init);
module_exit(my_module_exit);

MODULE_LICENSE("GPL");
MODULE_DESCRIPTION("A simple module demonstrating print_hex_dump.");
After inserting the module print_hexdump.ko we can see the kernel logs.
1
2
3
$ sudo dmesg -wH
[Jul20 16:22] Dumping data:
[  +0.000006] 00000000: 48 65 6c 6c 6f 20 4b 65 72 6e 65 6c 21 00        Hello Kernel!.
Feel free to use print_hex_dump also.
The print_hex_dump_bytes function in the Linux kernel is a convenient shorthand for printing a hex dump of binary data, combining both hexadecimal and ASCII representations.
1
2
void print_hex_dump_bytes(const char *prefix_str, int prefix_type,
                          const void *buf, size_t len);
Symbol
A symbol typically refers to a name that represents a variable or function in the code. It serves as an identifier that allows the kernel and modules to reference these variables or functions.
Types of Kernel Symbols
- Static Symbols: These are symbols that are only visible within the compilation unit (source file) where they are defined. They cannot be accessed by other modules or parts of the kernel.
- External Symbols: These symbols are potentially visible to any other code built into the kernel. They can be used by other parts of the kernel but are not necessarily exported for use by loadable modules.
- Exported Symbols: Exported symbols are made available to loadable kernel modules through the use of specific macros like
EXPORT_SYMBOL()orEXPORT_SYMBOL_GPL(). This allows other modules to call functions or access variables defined in one module.
Exporting Symbols The EXPORT_SYMBOL() macro is used to mark functions or variables that should be accessible from other kernel modules. For example:
1
EXPORT_SYMBOL(my_function);
The EXPORT_SYMBOL_GPL() macro restricts access to only those modules that are licensed under the GPL, promoting compliance with open-source licensing.
Kernel Symbol Table
- When a module is loaded, any symbol exported by that module becomes part of the kernel symbol table, which can be viewed in files such as
/proc/kallsyms. This table contains addresses of global kernel items—functions and variables—needed for modularized drivers. - The kernel symbol table is crucial for resolving undefined symbols when loading modules, allowing dynamic linking of modules at runtime.
/proc/kallsyms is a virtual file in the Linux filesystem that contains a list of all kernel symbols, including both built-in symbols and those from dynamically loaded modules.
BUG & WARN
In the Linux kernel, BUG() and WARN() are macros used for error reporting and debugging. They help developers identify and handle exceptional conditions in kernel code.
BUG() The BUG() macro is used to indicate a serious error in the kernel that should never occur. It is a way for developers to assert that a certain condition must be true, and if it is not, the kernel will terminate the offending process. When BUG() is called, it typically triggers a kernel oops, logging the error details and stopping the execution of the current process. The kernel may continue running other processes unless configured to panic on oops. BUG() is often used in situations where the code should never reach a particular point, indicating a critical failure in logic or assumptions made by the developer.
Example usage:
1
2
3
if (unlikely(condition)) {
    BUG(); // This condition should never be true
}
On x86 architectures, BUG() usually executes an invalid opcode (ud2), which results in an oops. The kernel then logs the stack trace and other relevant information before potentially terminating the offending process.
WARN()
The WARN() macro is used to log warning messages when a potentially problematic condition is detected but does not necessarily indicate a fatal error. Unlike BUG(), which halts execution, WARN() allows the kernel to continue running while logging a warning message to the kernel log. This is useful for conditions that may indicate issues but do not require immediate termination of the process or system. WARN() is used in scenarios where a non-fatal condition might lead to problems later on, such as unexpected values or states that could affect system performance or stability.
Example usage:
1
2
3
if (unlikely(condition)) {
    WARN("Unexpected condition encountered: %d", value);
}
Kernel Oops:
If the module causes a kernel oops (a non-fatal error), the kernel typically logs the error and continues running. In this case, you can usually unload the module using rmmod or modprobe -r commands, provided that the module is not in use by any other processes.
Kernel Panic:
If the module causes a kernel panic (a critical error that halts all operations), the system will stop functioning properly. In this scenario, you cannot unload the module because the kernel has stopped execution. The only option is to reboot the system.
Set Panic on Oops:
You can instruct the kernel to panic immediately upon encountering an oops by modifying /proc/sys/kernel/panic_on_oops. Set this value to 1:
1
echo "1" > /proc/sys/kernel/panic_on_oops
Here’s an example of how to implement a kernel module that causes an oops:
1
2
3
4
5
6
7
8
9
10
11
12
13
14
15
16
17
18
19
20
21
22
23
24
25
26
27
28
29
30
31
32
33
34
/*
kernel_oops.c
*/
#include <linux/module.h>
#include <linux/kernel.h>

// Function that will cause a kernel oops
static void cause_oops(void) {
    int *ptr = NULL; // Create a null pointer
    *ptr = 42;       // Dereference the null pointer, causing an oops
}

// Module initialization function
static int __init oops_module_init(void) {
    printk(KERN_INFO "Oops Module: Initializing...\n");
    cause_oops();    // Call the function that causes the oops
    return 0;        // This line will never be reached due to the oops
}


// Module cleanup function (not called in this case)
static void __exit oops_module_exit(void) {
    printk(KERN_INFO "Oops Module: Cleaning up...\n");
}


// Registering the initialization and cleanup functions
module_init(oops_module_init);
module_exit(oops_module_exit);


// Module metadata
MODULE_LICENSE("GPL");
MODULE_DESCRIPTION("A simple kernel module that causes a kernel oops.");
Module Still in Use:
If a module is still in use (e.g., it has open file descriptors or is being referenced by other modules), you will receive an error when attempting to unload it, regardless of whether it previously caused an error. The command will return something like:
ERROR: Module <module_name> is in use
You can forcefully remove a module using:
1
sudo rmmod --force <module_name>
In the upcoming blog, we’ll take the next step into kernel development by building our own character device driver and exploring IOCTLs—the essential interface for advanced device control. Don’t miss out!